The Best Gluten-Free English Muffin Recipe for Breakfast Lovers
Few breakfast foods are as comforting and timeless as warm English muffins fresh from the toaster. Their crisp golden exterior, soft chewy center, and signature little “nooks and crannies” make them perfect for soaking up butter, honey, jam, or melted cheese. However, finding truly delicious gluten-free English muffins can often feel impossible. Many store-bought versions are either too dry, too crumbly, or lacking the classic texture people love.
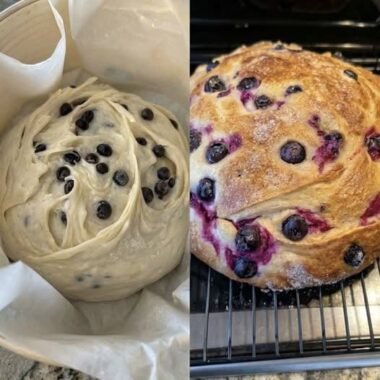
This homemade Gluten-Free English Muffin recipe changes everything. These muffins are soft on the inside, lightly crisp on the outside, and full of that traditional chewy texture that makes English muffins so satisfying. Best of all, they are made completely without gluten while still delivering bakery-style flavor and texture.
By combining gluten-free flour, almond flour, psyllium husk, yeast fermentation, and a traditional skillet-to-oven cooking method, this recipe creates muffins that taste homemade, hearty, and comforting. Whether you enjoy them toasted for breakfast, used for breakfast sandwiches, served with soup, or topped with avocado and eggs, these English muffins are versatile enough for every meal.
This recipe is perfect for anyone searching for:
- Gluten-free breakfast recipes
- Homemade English muffins
- Soft gluten-free bread recipes
- Healthy breakfast breads
- Gluten-free baking ideas
- Homemade sandwich muffins
- Easy yeast bread recipes
- Dairy-free baking options
- Breakfast meal prep recipes
- Classic English muffin alternatives
With their rich flavor and authentic texture, these homemade muffins prove that gluten-free baking can still be soft, flavorful, and deeply satisfying.
Why Homemade Gluten-Free English Muffins Taste Better
Many packaged gluten-free baked goods rely heavily on starches and preservatives to extend shelf life. Unfortunately, this often creates dry texture and artificial flavor.
Homemade gluten-free English muffins offer several advantages:
Better Texture
Freshly made muffins stay soft inside while developing a crisp toasted surface.
More Flavor
Yeast fermentation creates deeper flavor than many commercial products.
Customizable Ingredients
You control the type of flour, sweetness level, dairy content, and add-ins.
Freshness Without Preservatives
Homemade baking tastes cleaner and more natural.
More Nutritious Options
You can incorporate wholesome ingredients like almond flour and psyllium husk for added texture and nutrition.
The Secret Behind Perfect Gluten-Free Texture
Traditional English muffins rely on gluten for structure and chewiness. Without gluten, many recipes become dense or crumbly. This recipe uses a combination of ingredients that help recreate the texture of classic bakery-style muffins.
Psyllium Husk Powder
Psyllium husk acts as a natural binder and creates elasticity in gluten-free dough. It helps trap air during rising, resulting in softer muffins with better structure.
Almond Flour
Almond flour adds moisture and richness while preventing dryness.
Yeast Fermentation
Allowing the dough to rise creates airy texture and deeper flavor.
Two-Step Cooking Method
Cooking first on a skillet and then finishing in the oven creates the classic English muffin crust and fluffy interior.
What Makes These English Muffins Special
Unlike many gluten-free breads that feel overly dense, these muffins maintain a soft center with a light chew.
Crisp Golden Exterior
The skillet cooking process creates a lightly crisp crust similar to traditional English muffins.
Tender Inside Texture
The center remains soft and airy after baking.
Signature Nooks and Crannies
Fork-splitting the muffins creates rough interior pockets ideal for butter and jam.
Excellent for Toasting
The muffins become beautifully golden and slightly crunchy after toasting.
Choosing the Best Gluten-Free Flour Blend
Not all gluten-free flours behave the same way in baking.
For best results, use a high-quality gluten-free all-purpose flour blend that already contains xanthan gum. This improves structure and texture.
Popular gluten-free flour blends often include:
- Rice flour
- Potato starch
- Tapioca starch
- Sorghum flour
- Xanthan gum
A balanced blend creates more stable dough and softer baked results.
Why Almond Flour Improves the Recipe
Almond flour is one of the key ingredients that makes these muffins feel rich and moist instead of dry.
Benefits of Almond Flour
- Adds moisture
- Creates tender crumb
- Provides slightly nutty flavor
- Helps improve softness
- Enhances richness naturally
The combination of almond flour and gluten-free flour blend creates balanced texture.
Understanding the Importance of Yeast
Yeast is responsible for both rise and flavor.
Proper Yeast Activation
Warm milk combined with honey or maple syrup helps activate the yeast properly.
The mixture should become foamy after resting. This indicates active yeast.
Why Temperature Matters
Milk that is too hot may kill the yeast, while cold liquid may prevent activation.
Ideal temperature is around 105°F (40°C).
The Role of Apple Cider Vinegar
A small amount of apple cider vinegar may seem simple, but it plays an important role.
Helps Dough Rise
It reacts with baking soda to improve lift.
Adds Mild Tang
It creates subtle flavor similar to traditional fermented bread.
Improves Texture
The acidity helps strengthen gluten-free dough structure.
Why Skillet Cooking Creates Authentic English Muffins
Traditional English muffins are partially cooked on a griddle before baking. This method gives them their characteristic crust and chewy texture.
Benefits of Griddle Cooking
- Creates golden outer crust
- Helps muffins hold shape
- Produces authentic texture
- Prevents overly soft exterior
Cooking slowly over medium-low heat is important. High heat can brown the outside too quickly before the inside cooks fully.
Finishing in the Oven for Perfect Results
The oven step ensures the center cooks completely without burning the exterior.
Why This Step Matters
- Sets the crumb structure
- Creates fluffy interior
- Prevents gummy centers
- Gives balanced texture
This two-stage method is one of the biggest secrets behind bakery-quality gluten-free English muffins.
Best Ways to Serve Gluten-Free English Muffins
These muffins are extremely versatile and work for many meals.
Breakfast Favorites
- Butter and jam
- Peanut butter
- Honey drizzle
- Cream cheese
- Scrambled eggs
Savory Meal Ideas
- Breakfast sandwiches
- Avocado toast
- Mini burgers
- Eggs Benedict
- Melted cheese sandwiches
Sweet Serving Options
- Nutella
- Fresh berries
- Maple syrup
- Cinnamon butter
Creative Flavor Variations
Once you master the base recipe, you can customize it in many delicious ways.
Cinnamon Raisin Muffins
Add cinnamon and raisins for sweeter breakfast flavor.
Herb and Garlic Muffins
Mix in garlic powder and dried herbs for savory sandwiches.
Cheese English Muffins
Fold shredded cheese into the dough for extra richness.
Whole Grain Variation
Use small amounts of sorghum or brown rice flour for heartier flavor.
Helpful Tips for Perfect Muffins
Small details make a big difference in gluten-free baking.
Dust with Cornmeal
Cornmeal creates classic English muffin texture and prevents sticking.
Let Dough Rest Properly
Resting improves structure and flavor.
Avoid Too Much Flour
Overly dry dough creates dense muffins.
Use a Fork to Split
Fork-splitting preserves the famous rough texture inside.
Toast Before Serving
Toasting enhances flavor and texture beautifully.
Storage and Meal Prep Tips
These homemade English muffins store surprisingly well.
Room Temperature
Store in an airtight container for up to 2 days.
Refrigerator
Keep refrigerated for up to 5 days.
Freezer Storage
Wrap individually and freeze for up to 2 months.
Reheating
Toast directly from frozen or warm in the oven.
Common Gluten-Free Baking Mistakes
Skipping Psyllium Husk
Without it, texture may become crumbly.
Using Hot Liquid
Excess heat can kill yeast.
Cooking Over High Heat
This burns the outside before the inside cooks.
Cutting Before Cooling
Warm muffins may become gummy if sliced too soon.
Why This Recipe Works for Different Diets
This recipe can easily fit various dietary preferences.
Gluten-Free Diet
Completely wheat-free and gluten-free.
Dairy-Free Option
Use plant-based milk and dairy-free butter alternatives.
Vegetarian-Friendly
Made without meat ingredients.
Lower Sugar Baking
Only a small amount of sweetener is needed.
Frequently Asked Questions
Can I Freeze These Muffins?
Yes. Freeze individually wrapped muffins for easy breakfasts later.
Can I Use Plant-Based Milk?
Absolutely. Almond milk, oat milk, or soy milk work well.
Why Is My Dough Sticky?
Gluten-free dough naturally feels softer and stickier than wheat dough.
Can I Add Seeds or Herbs?
Yes. Chia seeds, flaxseeds, garlic, herbs, or shredded cheese all work beautifully.
Are These Good for Breakfast Sandwiches?
Definitely. Their sturdy texture makes them ideal for sandwiches.
Why Homemade English Muffins Are Worth Making
Fresh homemade English muffins offer something store-bought versions rarely achieve: authentic flavor and texture. The process may take a little patience, but the results are rewarding.
The aroma of yeast bread cooking on a skillet, the crisp golden crust, and the soft airy interior create a bakery-style experience right at home.
These muffins also freeze well, making them excellent for meal prep and busy mornings.
Final Thoughts
These homemade Gluten-Free English Muffins combine classic comfort with modern gluten-free baking techniques to create soft, chewy, golden muffins full of flavor and texture. The combination of gluten-free flour blend, almond flour, psyllium husk, and traditional cooking methods results in muffins that feel authentic and satisfying.
Whether enjoyed with butter and jam, transformed into breakfast sandwiches, or served alongside eggs and coffee, these muffins deliver homemade comfort in every bite.
If you are searching for the best gluten-free breakfast bread, homemade English muffin recipe, soft gluten-free baked goods, or easy yeast bread alternative, this recipe deserves a permanent place in your kitchen.
Part 2: Simple Gluten-Free English Muffin Recipe
Easy Homemade Gluten-Free English Muffins
Preparation Time
- Prep Time: 25 minutes
- Rising Time: 1 hour 20 minutes
- Cook & Bake Time: 20 minutes
- Total Time: Approximately 2 hours
Servings
Makes about 8 English muffins
Ingredients
Dry Ingredients
- 2 cups gluten-free all-purpose flour with xanthan gum
- ½ cup almond flour
- 1 tablespoon psyllium husk powder
- 2 teaspoons baking powder
- ½ teaspoon baking soda
- ½ teaspoon sea salt
Wet Ingredients
- 1¼ cups warm milk (dairy or plant-based)
- 1 tablespoon honey or maple syrup
- 1 packet active dry yeast (2¼ teaspoons)
- 1 large egg, room temperature
- 2 tablespoons melted butter or olive oil
- 1 teaspoon apple cider vinegar
For Cooking
- Cornmeal or gluten-free semolina for dusting
- Butter or oil for greasing
Equipment Needed
- Mixing bowls
- Whisk or wooden spoon
- Measuring cups and spoons
- Nonstick skillet or griddle
- Baking tray
- Parchment paper
- Wire cooling rack
Instructions
Step 1: Activate the Yeast
Combine warm milk, honey, and yeast in a bowl. Let sit for 10 minutes until foamy.
Step 2: Mix Dry Ingredients
In a large bowl, whisk together gluten-free flour, almond flour, psyllium husk powder, baking powder, baking soda, and salt.
Step 3: Prepare the Dough
Add the yeast mixture, egg, melted butter or oil, and apple cider vinegar to the dry ingredients. Mix until a thick sticky dough forms.
Step 4: First Rise
Cover the bowl and let the dough rise in a warm area for 45–60 minutes.
Step 5: Shape the Muffins
Dust a surface with gluten-free flour and cornmeal. Shape dough portions into rounds about 3 inches wide.
Step 6: Rest Again
Place shaped muffins on parchment paper dusted with cornmeal. Cover and rest for 20 minutes.
Step 7: Cook on Skillet
Heat a greased skillet over medium-low heat. Cook muffins for 5–6 minutes per side until golden brown.
Step 8: Finish Baking
Transfer muffins to a preheated 350°F (175°C) oven and bake for 10–12 minutes.
Step 9: Cool and Serve
Cool completely on a wire rack. Split with a fork, toast, and serve warm.