Few things compare to the aroma of freshly baked bread coming out of the oven. A homemade sandwich loaf delivers a comforting experience that combines warmth, softness, freshness, and incredible flavor in every slice. This Thermomix Sandwich Loaf is designed for anyone who loves bakery-style bread with a light texture, tender crumb, and delicate golden crust.
Whether you’re preparing breakfast toast, lunchbox sandwiches, grilled cheese, French toast, or simple buttered bread, this versatile loaf fits perfectly into everyday meals. Thanks to the Thermomix, creating soft homemade bread becomes easier, more consistent, and less time-consuming than traditional hand-kneading methods.
One reason this loaf remains so popular among home bakers is its wonderful balance of texture and flavor. The inside stays soft and airy while the outside develops a thin golden crust that enhances every bite. Combined with subtle buttery richness and a mild sweetness, the result is a loaf that tastes fresh, wholesome, and incredibly satisfying.
Modern home baking continues to grow in popularity because people appreciate simple ingredients, fresher taste, and the satisfaction of creating food from scratch. This Thermomix bread recipe delivers all those benefits while providing dependable results for beginners and experienced bakers alike.
The Growing Popularity of Homemade Bread Baking
In recent years, homemade bread has become one of the most searched baking topics online. People around the world are discovering that baking bread at home offers advantages that packaged bread simply cannot match.
Freshly baked bread often provides:
- Better flavor
- Softer texture
- Richer aroma
- Greater ingredient control
- Fewer preservatives
- Enhanced freshness
Store-bought bread may be convenient, but homemade bread creates a completely different experience. The texture feels softer, the flavor tastes more natural, and the aroma fills the kitchen with a comforting bakery-like atmosphere.
Another major advantage is customization. Home bakers can adjust ingredients, experiment with flavors, and create bread tailored to their family’s preferences.
How Thermomix Simplifies Homemade Bread Making
Bread baking traditionally requires extensive mixing and kneading. The Thermomix simplifies these processes while helping maintain consistency throughout dough preparation.
Many bakers appreciate the Thermomix because it assists with:
- Accurate ingredient blending
- Consistent kneading
- Reliable dough development
- Reduced physical effort
- Better dough texture
Because bread relies heavily on proper gluten development, consistent kneading is essential. The Thermomix helps create a dough that is smooth, elastic, and ready for successful fermentation.
The result is often a softer loaf with excellent volume and a more even crumb structure.
The Secret Behind Soft White Sandwich Bread
A great sandwich loaf is more than simply flour, water, and yeast. Several baking principles work together to create the perfect texture.
Successful sandwich bread depends on:
- Proper hydration
- Effective kneading
- Strong gluten development
- Balanced fermentation
- Careful proofing
- Correct baking temperature
When these elements are managed correctly, the bread develops a soft interior while maintaining enough structure for slicing and sandwich making.
The goal is a loaf that remains light and fluffy without becoming fragile or crumbly.
Understanding the Science of Bread Structure
Bread may seem simple, but several fascinating processes occur during preparation and baking.
One of the most important is gluten formation. When flour combines with liquid and is kneaded, proteins within the flour begin forming a network known as gluten.
This network acts like a framework that supports the bread’s structure.
A strong gluten network helps:
- Trap fermentation gases
- Improve elasticity
- Support loaf volume
- Create a lighter crumb
- Produce better texture
Without sufficient gluten development, bread may become dense, flat, or heavy.
Why Gluten Development Matters
Gluten development is one of the most important stages of bread making.
As the dough is kneaded, gluten strands align and strengthen. This process creates elasticity, allowing the dough to stretch and expand as yeast produces gas.
Well-developed dough typically feels:
- Smooth
- Flexible
- Slightly stretchy
- Soft to the touch
Proper gluten development contributes directly to the fluffy texture that people expect from high-quality sandwich bread.
The Important Role of Yeast Fermentation
Yeast is responsible for transforming a simple dough into a soft, airy loaf.
During fermentation, yeast consumes available sugars and releases carbon dioxide gas. These tiny gas bubbles become trapped inside the dough, causing it to rise.
Fermentation contributes to:
- Better flavor
- Improved aroma
- Greater loaf volume
- Softer crumb
- Enhanced texture
Allowing dough sufficient time to ferment often results in significantly better bread.
Many beginner bakers underestimate the importance of patience during this stage. Proper fermentation is one of the keys to bakery-quality results.
Hydration: The Foundation of Soft Bread
Hydration refers to the amount of liquid incorporated into the dough.
Milk or water hydrates the flour and allows gluten formation to begin. Proper hydration creates a dough that can stretch, expand, and retain moisture throughout baking.
Benefits of correct hydration include:
- Softer texture
- Better crumb structure
- Increased loaf volume
- Improved freshness
- Moist interior
A well-hydrated dough generally produces softer bread than a dough that is too dry.
Why Milk Produces an Extra-Tender Loaf
Many sandwich bread recipes use milk because it contributes richness and softness.
Milk contains proteins, natural sugars, and fats that improve the final bread in several ways.
Milk helps provide:
- Tender crumb
- Rich flavor
- Better browning
- Improved moisture retention
- Longer-lasting softness
These qualities make milk a favorite ingredient in homemade sandwich loaves.
What Makes the Perfect Sandwich Bread Texture?
An ideal sandwich loaf should be sturdy enough to hold fillings while remaining pleasantly soft.
The best homemade sandwich bread offers:
- Fluffy crumb
- Moist slices
- Light structure
- Flexible texture
- Thin crust
- Easy slicing
The bread should not feel dry, dense, or overly chewy.
When prepared correctly, every slice remains soft enough for sandwiches while still holding its shape beautifully.
Key Ingredients and Their Purpose
Every ingredient plays a unique role in creating the finished loaf.
Bread Flour
Bread flour provides the protein necessary for strong gluten development.
Benefits include:
- Better elasticity
- Stronger structure
- Improved loaf height
- Enhanced texture
Yeast
Yeast creates fermentation and helps the dough rise.
It contributes:
- Air pockets
- Flavor development
- Light crumb structure
Milk or Water
The liquid hydrates flour and supports gluten formation.
It contributes:
- Moisture
- Dough consistency
- Softness
Butter
Butter enriches the dough and improves tenderness.
Benefits include:
- Rich flavor
- Softer crumb
- Better mouthfeel
Sugar
Sugar adds a touch of sweetness while supporting yeast activity.
Additional benefits include:
- Better browning
- Improved flavor balance
Salt
Salt is essential for strengthening dough structure and enhancing flavor.
Without salt, bread often tastes flat and lacks balance.
Optional Ingredients for Extra Flavor
Several optional ingredients can add unique characteristics while preserving the loaf’s soft texture.
Popular additions include:
Honey
Provides natural sweetness and moisture.
Milk Powder
Enhances dairy flavor and softness.
Olive Oil
Adds richness and tenderness.
Oats
Contribute texture and rustic character.
Seeds
Sesame or sunflower seeds add crunch and visual appeal.
Creating the Dough in Your Thermomix
Stage One: Combining the Ingredients
The first step involves mixing the ingredients evenly.
Proper blending helps ensure:
- Uniform hydration
- Even yeast distribution
- Consistent dough texture
Thorough mixing creates a strong foundation for successful bread making.
Stage Two: Developing Dough Strength
Once ingredients are combined, kneading begins.
Kneading is responsible for:
- Building gluten
- Improving elasticity
- Strengthening structure
- Supporting fermentation
A properly kneaded dough becomes smooth, supple, and slightly stretchy.
How to Identify Well-Prepared Dough
Knowing what dough should look and feel like is important.
Well-developed dough should:
- Feel soft
- Stretch gently
- Hold together smoothly
- Resist tearing
Elastic dough traps gas more effectively, resulting in lighter bread.
First Rise: Building Flavor and Volume
After kneading, the dough should rest and rise.
During this stage:
- Yeast becomes active
- Flavor develops
- Gas accumulates
- Dough expands
The dough should roughly double in size before moving to the next step.
This stage contributes greatly to the final softness of the loaf.
Shaping the Dough for Better Results
Proper shaping helps create a loaf with an even structure.
Good shaping encourages:
- Uniform slices
- Balanced rise
- Attractive appearance
- Improved loaf stability
Careful shaping also creates surface tension that helps support oven spring.
Second Proofing: The Step You Should Never Skip
After shaping, the dough undergoes a second rise.
This final proof allows the dough to relax and expand further before baking.
Benefits include:
- Increased volume
- Lighter crumb
- Softer texture
- Improved appearance
Skipping this stage often leads to heavier bread with reduced softness.
Baking for a Beautiful Golden Finish
When the loaf enters the oven, several transformations occur rapidly.
Heat activates what bakers call oven spring, a final burst of expansion before the crust begins to set.
This creates:
- Taller bread
- Better crumb structure
- Improved texture
- Professional appearance
The loaf gradually develops a beautiful golden color while retaining internal moisture.
The Role of Steam During Baking
As moisture inside the dough heats, it converts into steam.
Steam contributes to:
- Expansion
- Softer crumb
- Better volume
- Improved texture
Proper moisture balance is essential for achieving a light and tender loaf.
Why Cooling Is Just as Important as Baking
Many people are tempted to slice bread immediately after it leaves the oven.
However, cooling serves an important purpose.
Cooling allows:
- Moisture redistribution
- Structure stabilization
- Cleaner slicing
- Better texture
Cutting too early may compress the loaf and create a gummy interior.
Flavor, Aroma, and Eating Experience
A successful Thermomix Sandwich Loaf delivers a comforting combination of flavors and textures.
Expect:
- Mild wheat flavor
- Light buttery notes
- Gentle sweetness
- Fresh bakery aroma
The overall experience is warm, soft, and deeply satisfying.
Common Bread Problems and How to Fix Them
Dense Texture
Usually caused by insufficient kneading or under-proofing.
Dry Bread
Often the result of excessive baking time.
Sunken Loaf
Typically caused by over-proofing.
Sticky Dough
May occur when too much liquid is added.
Bland Flavor
Longer fermentation often improves flavor complexity.
Creative Bread Variations
Honey Loaf
Substitute honey for sugar.
Whole Wheat Version
Replace a portion of bread flour with whole wheat flour.
Seeded Bread
Add sesame or sunflower seeds.
Extra Soft Milk Bread
Increase milk and butter slightly.
Savory Herb Bread
Incorporate dried herbs for additional flavor.
Best Storage Methods
For maximum freshness:
- Store in an airtight container.
- Keep at room temperature.
- Freeze slices for longer storage.
- Thaw as needed.
Proper storage helps maintain softness and flavor for several days.
Delicious Ways to Serve Homemade Sandwich Bread
Enjoy this loaf:
- As sandwich bread
- Toasted with butter
- With honey or jam
- For grilled cheese
- With soups and stews
- Alongside eggs and cheese
Its versatility makes it one of the most useful breads to keep in the kitchen.
Professional Baking Tips for Perfect Results
For consistently soft bread:
- Use quality bread flour.
- Allow full proofing time.
- Knead until elastic.
- Avoid excess flour.
- Cool completely before slicing.
- Brush the crust with butter after baking.
Following these simple techniques helps create a loaf that rivals bakery-quality bread while maintaining the comfort and freshness of homemade baking.
Every slice of this Thermomix Sandwich Loaf delivers a fluffy crumb, delicate crust, buttery richness, and irresistible homemade flavor that makes it perfect for everyday enjoyment.
PART 2 – SIMPLE THERMOMIX SANDWICH BREAD RECIPE
Yield
1 Standard Loaf (10–12 slices)
Preparation Time
- Prep Time: 15 minutes
- First Rise: 60–90 minutes
- Second Rise: 30–45 minutes
- Bake Time: 30–35 minutes
- Total Time: About 3 hours
Ingredients
Core Ingredients
- 500g bread flour
- 7g instant yeast
- 300ml lukewarm milk or water
- 40g softened butter
- 25g sugar
- 1 tsp salt
Optional Add-Ins
- 1 tbsp honey
- 1 tbsp milk powder
- 1 tbsp olive oil
- 2 tbsp rolled oats
- 2 tbsp sesame seeds or sunflower seeds
Instructions
Step 1 – Mix the Dough
Place milk (or water), yeast, sugar, flour, butter, and salt into the Thermomix bowl. Mix until combined.
Step 2 – Knead
Use the dough/kneading mode until the dough becomes smooth, soft, and elastic.
Step 3 – First Rise
Transfer dough to a lightly greased bowl. Cover and leave in a warm place until doubled in size.
Step 4 – Shape
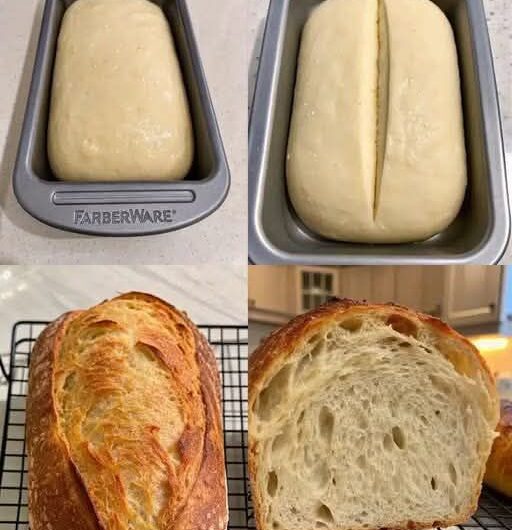
Gently punch down the dough and shape it into a loaf. Place into a greased loaf tin.
Step 5 – Final Proof
Cover loosely and let rise again until puffy and nearly doubled.
Step 6 – Bake
Bake in a preheated oven at 180°C (350°F) for 30–35 minutes or until golden brown.
Step 7 – Cool
Remove from the pan and cool completely on a wire rack before slicing.
Serving Suggestions
- Toast with butter
- Sandwiches
- Grilled cheese
- Jam or honey toast
- Soup accompaniment
- Breakfast bread
Storage
- Store airtight at room temperature for up to 3 days.
- Freeze sliced bread for up to 2 months.