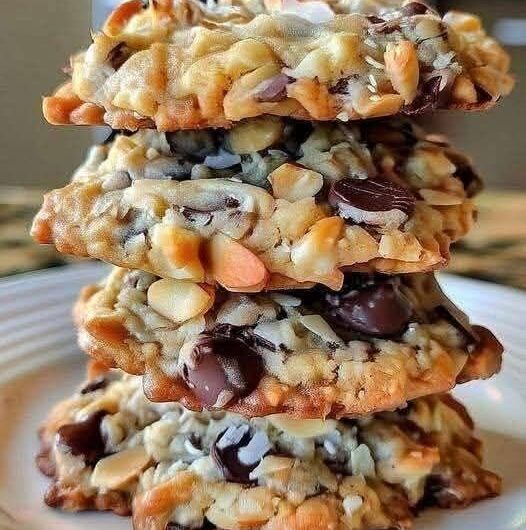
There’s something unforgettable about biting into a freshly baked cookie with crisp golden edges, a soft and chewy center, and pockets of warm, melted chocolate in every bite. These Cookies Magiques, also known as Magic Cookies, deliver exactly that experience. Despite their impressive texture and rich flavor, they’re made with everyday pantry ingredients and a few simple baking techniques that transform ordinary cookie dough into an irresistible homemade treat.
The word magic doesn’t come from unusual ingredients—it comes from the remarkable transformation that happens in the oven. As the butter melts, sugars caramelize, chocolate softens, and the dough rises and spreads, creating layers of texture and flavor that make every cookie taste like it came straight from a professional bakery.
Whether you’re baking for family, holidays, special occasions, or simply satisfying a sweet craving, this easy cookie recipe is designed to produce thick, buttery cookies with crispy edges and gooey centers every single time.
Why You’ll Love These Homemade Magic Cookies
These bakery-style cookies have become a favorite because they combine everything cookie lovers enjoy in one delicious bite.
Here’s why this recipe stands out:
- Crispy golden edges with soft, chewy centers
- Rich buttery flavor in every bite
- Loaded with melted chocolate chunks
- Easy to prepare using common pantry ingredients
- Perfect for beginner and experienced bakers
- Ideal for holidays, cookie exchanges, and gifting
- Great for freezing and make-ahead baking
- Easy to customize with nuts or different chocolates
- Soft texture that stays fresh for days
- Delicious served warm or at room temperature
Their combination of texture, sweetness, and rich chocolate makes them one of the most popular homemade cookie recipes.
What Makes These Cookies Truly “Magic”?
The secret isn’t hidden in one special ingredient—it’s found in the way each ingredient works together during baking.
When the dough enters the hot oven, several natural reactions begin happening at once.
The butter slowly melts, helping the cookies spread just enough.
The sugars caramelize, creating rich flavor and beautiful golden edges.
The eggs provide structure while keeping the interior moist.
Meanwhile, the chocolate softens into creamy pockets that stay slightly molten after baking.
Together, these changes create multiple layers of texture:
- Lightly crisp outside
- Tender middle
- Soft chewy interior
- Rich buttery finish
- Melted chocolate throughout
That incredible contrast is exactly why they’re known as Magic Cookies.
Why Bakery-Style Cookies Are So Popular
Over the past several years, thick bakery-style cookies have become one of the most searched homemade dessert recipes.
Unlike thin, crunchy cookies, bakery cookies are known for:
- Thick centers
- Soft interiors
- Crisp edges
- Large chocolate chunks
- Rich buttery flavor
- Beautiful cracked tops
They’re satisfying, indulgent, and perfect for sharing.
Because they’re slightly underbaked in the center, they remain soft for much longer than traditional cookies.
Understanding the Ingredients
Although the ingredient list is simple, each item contributes something important to the final result.
Unsalted Butter
Butter forms the flavorful base of these cookies.
It adds:
- Richness
- Tender texture
- Moisture
- Golden color
- Delicious aroma
Using softened butter allows air to become incorporated during mixing, creating cookies that bake evenly while remaining soft.
Brown Sugar
Brown sugar contributes much more than sweetness.
Its natural molasses content provides:
- Moisture
- Soft texture
- Chewy consistency
- Deep caramel flavor
This ingredient is largely responsible for the bakery-style chewiness.
White Sugar
White sugar balances the brown sugar beautifully.
It helps create:
- Crisp edges
- Light caramelization
- Balanced sweetness
- Better cookie spread
Using both sugars produces the perfect contrast between crispness and chewiness.
Eggs
Eggs hold the dough together while adding richness and moisture.
As the cookies bake, egg proteins strengthen the cookie structure without making them dry.
They also help produce a smooth, uniform dough.
Vanilla Extract
Pure vanilla enhances every other ingredient.
Its warm aroma makes the chocolate taste richer while giving the cookies their classic homemade flavor.
Even a small amount dramatically improves the finished cookies.
Flour
Flour provides the framework that holds everything together.
Too much flour creates dry cookies.
Too little causes excessive spreading.
Measuring accurately ensures perfectly thick cookies.
Baking Soda
Baking soda helps cookies rise slightly while encouraging beautiful browning.
It also reacts with the acidity in brown sugar to create a tender texture.
Salt
Although used in a small amount, salt plays an important role.
It balances sweetness while highlighting the rich butter and chocolate flavors.
Chocolate Chunks
Large chocolate chunks create pockets of melted chocolate throughout each cookie.
Compared to smaller chips, chunks provide a richer chocolate experience and a more bakery-style appearance.
You can use milk chocolate, semi-sweet chocolate, dark chocolate, or a combination for extra flavor.
The Importance of Softened Butter
One of the biggest secrets to bakery-quality cookies is using properly softened butter.
Soft butter should feel cool but press easily with your finger.
It should never appear oily or melted.
Properly softened butter traps tiny air bubbles during mixing.
These air pockets expand in the oven, creating lighter cookies with better texture.
Melted butter, on the other hand, creates thinner cookies that spread more quickly.
Why Creaming Butter and Sugar Matters
The creaming process is often overlooked, but it’s one of the most important baking steps.
Beating softened butter together with brown and white sugar incorporates tiny pockets of air.
This creates cookies that bake evenly while remaining soft inside.
The mixture should become:
- Light in color
- Creamy
- Fluffy
- Smooth
Taking a few extra minutes during this step greatly improves the final texture.
The Secret to Thick Cookies
If you’ve ever wondered why bakery cookies stay thick while homemade cookies sometimes spread too much, the answer is surprisingly simple.
Chilling the dough before baking allows the butter to firm up again.
Cold butter melts more slowly in the oven.
This slower melting helps the cookies keep their height while still developing crisp edges.
Even a short chilling time noticeably improves:
- Thickness
- Texture
- Flavor
- Appearance
Many professional bakers chill cookie dough for several hours or overnight to achieve the very best results.
Avoid Overmixing
After adding the flour, mix only until the ingredients are combined.
Overmixing develops too much gluten.
Excess gluten produces cookies that are:
- Tough
- Dense
- Less tender
Gentle mixing creates soft cookies with a delicate crumb.
Creative Flavor Variations
Although these classic cookies are delicious exactly as written, they’re also easy to personalize.
Double Chocolate Magic Cookies
Mix unsweetened cocoa powder into the dough and use dark chocolate chunks.
Salted Caramel Cookies
Fold caramel pieces into the dough and sprinkle flaky sea salt on top before baking.
White Chocolate Version
Replace some or all of the chocolate chunks with creamy white chocolate.
Nut Lover’s Cookies
Add chopped walnuts or pecans for extra crunch and flavor.
Espresso Chocolate Cookies
A small amount of espresso powder enhances the richness of the chocolate without making the cookies taste like coffee.
Storage Tips
Store completely cooled cookies in an airtight container at room temperature for up to five days.
To keep them especially soft, place a slice of bread inside the storage container.
The bread helps maintain moisture without affecting flavor.
Cookie dough also freezes beautifully.
Shape into portions before freezing, then bake directly from frozen by adding an extra minute or two to the baking time.
Serving Ideas
These cookies are delicious on their own but also pair wonderfully with:
- Cold milk
- Fresh coffee
- Hot chocolate
- Vanilla ice cream
- Chocolate milk
- Caramel latte
- Espresso
- Homemade milkshakes
Serve slightly warm for the ultimate gooey chocolate experience.
Common Baking Mistakes
Flat Cookies
Usually caused by overly soft butter or skipping the chilling step.
Dry Cookies
Often the result of too much flour or overbaking.
Tough Texture
Typically caused by overmixing once the flour has been added.
Burnt Bottoms
Using parchment paper and baking on the center oven rack helps prevent over-browning.
Frequently Asked Questions
Can I freeze the cookie dough?
Yes. Scoop the dough into portions, freeze until firm, and store in freezer bags for up to three months.
Which chocolate works best?
High-quality semi-sweet or dark chocolate chunks provide the richest flavor, although milk chocolate also works beautifully.
Why should I chill the dough?
Chilling improves texture, reduces spreading, and deepens the flavor.
Can I use salted butter?
Yes, but reduce the added salt slightly to keep the flavor balanced.
How do I know when they’re finished baking?
The edges should be lightly golden while the centers still look slightly soft. They will continue setting as they cool.
Final Thoughts
These Cookies Magiques (Magic Cookies) combine everything people love about bakery-style cookies—golden crisp edges, chewy centers, rich buttery flavor, and generous pockets of melted chocolate. By using simple ingredients and a few easy baking techniques, you can create cookies that look and taste like they came from a professional bakery.
Whether you’re baking for a celebration, preparing homemade gifts, or simply treating yourself to a comforting dessert, this recipe delivers consistently delicious results. Once you master the balance of butter, sugar, flour, and chocolate, you’ll have a go-to cookie recipe that friends and family will request again and again.
Source: Inspired by the recipe content provided by the user and completely rewritten with original wording, enhanced structure, expanded baking guidance, and SEO-friendly formatting for unique publication.
Part 2
Cookies Magiques (Magic Cookies) Recipe
These homemade Cookies Magiques are rich, buttery, and loaded with chocolate chunks. With crisp golden edges and soft, chewy centers, they’re an easy bakery-style cookie that’s perfect for holidays, family gatherings, or an everyday sweet treat.
Recipe Information
- Prep Time: 15 minutes
- Chill Time: 30 minutes (Recommended)
- Bake Time: 10–12 minutes
- Total Time: About 55–60 minutes
- Course: Dessert
- Cuisine: French-Inspired / American Bakery Style
- Servings: 20–24 cookies
- Calories: Approximately 240 kcal per cookie
Equipment
- Large mixing bowl
- Medium mixing bowl
- Electric hand mixer or stand mixer
- Measuring cups and spoons
- Rubber spatula
- Cookie scoop or tablespoon
- Baking sheet
- Parchment paper or silicone baking mat
- Cooling rack
Ingredients
For the Cookie Dough
- 1 cup unsalted butter, softened (not melted)
- 1 cup packed brown sugar
- ½ cup granulated white sugar
- 2 large eggs, at room temperature
- 2 teaspoons pure vanilla extract
- 2½ cups all-purpose flour
- 1 teaspoon baking soda
- ½ teaspoon salt
- 2 cups chocolate chunks or chocolate chips
Optional Add-Ins
- ½ cup chopped walnuts
- ½ cup chopped pecans
- Flaky sea salt for topping
- Caramel pieces
- White chocolate chunks
- Dark chocolate chunks
Instructions
Step 1 – Prepare the Butter
Allow the butter to soften at room temperature until it is smooth enough to press with your finger but still holds its shape. Avoid melting the butter, as this can cause the cookies to spread too much during baking.
Step 2 – Cream the Butter and Sugars
In a large mixing bowl, beat the softened butter, brown sugar, and granulated sugar together for 2–3 minutes until the mixture becomes light, creamy, and fluffy.
This step creates air pockets that help produce soft, thick cookies.
Step 3 – Add the Wet Ingredients
Add the eggs one at a time, mixing well after each addition.
Stir in the vanilla extract until fully incorporated.
Step 4 – Mix the Dry Ingredients
In a separate bowl, whisk together:
- All-purpose flour
- Baking soda
- Salt
Gradually add the dry ingredients to the wet mixture, mixing on low speed just until no streaks of flour remain.
Do not overmix.
Step 5 – Fold in the Chocolate
Using a spatula, gently fold the chocolate chunks or chocolate chips into the dough until evenly distributed.
If using walnuts, pecans, caramel pieces, or additional chocolate varieties, fold them in at this stage.
Step 6 – Chill the Dough
Cover the bowl and refrigerate the cookie dough for at least 30 minutes.
Chilling helps prevent excessive spreading and creates thicker, chewier cookies with richer flavor.
Step 7 – Shape the Cookies
Preheat your oven to 350°F (175°C).
Line a baking sheet with parchment paper.
Use a cookie scoop or tablespoon to portion the dough into evenly sized balls.
Place them about 2 inches apart to allow room for spreading.
If desired, press a few extra chocolate chunks onto the tops of each cookie for a bakery-style appearance.
Step 8 – Bake
Bake for 10–12 minutes, or until the edges are lightly golden while the centers still appear slightly soft.
Avoid overbaking, as the cookies will continue to set while cooling.
Step 9 – Cool and Serve
Allow the cookies to cool on the baking sheet for 5 minutes before transferring them to a wire rack.
Serve warm for soft, gooey chocolate centers or allow them to cool completely for a perfectly chewy texture.
Expert Baking Tips
- Always use softened—not melted—butter.
- Measure flour accurately using the spoon-and-level method.
- Chill the dough before baking for thicker cookies.
- Use high-quality chocolate for the richest flavor.
- Don’t overmix once the flour is added.
- Remove the cookies when the centers still look slightly underbaked—they’ll finish cooking as they cool.
Flavor Variations
Double Chocolate Magic Cookies
Add 2 tablespoons unsweetened cocoa powder to the flour mixture and use dark chocolate chunks.
Salted Caramel Cookies
Mix caramel pieces into the dough and sprinkle flaky sea salt over the cookies before baking.
White Chocolate Version
Replace some or all of the chocolate chunks with white chocolate pieces.
Nutty Bakery Cookies
Add chopped toasted walnuts or pecans for extra crunch and flavor.
Espresso Chocolate Cookies
Mix 1 teaspoon instant espresso powder into the dry ingredients to enhance the chocolate flavor.
Serving Suggestions
These cookies pair wonderfully with:
- Cold milk
- Freshly brewed coffee
- Hot chocolate
- Vanilla ice cream
- Chocolate milk
- Caramel latte
- Espresso
- Fresh berries
Storage
Store cooled cookies in an airtight container at room temperature for up to 5 days.
For longer storage, freeze baked cookies in a freezer-safe container for up to 3 months.
Separate layers with parchment paper to prevent sticking.
Freezing the Dough
Scoop the dough into individual portions and freeze until solid.
Transfer the frozen dough balls to a freezer bag and store for up to 3 months.
Bake directly from frozen, adding 1–2 extra minutes to the baking time.
Estimated Nutrition (Per Cookie)
- Calories: 240 kcal
- Carbohydrates: 30 g
- Protein: 3 g
- Fat: 12 g
- Saturated Fat: 7 g
- Cholesterol: 40 mg
- Sodium: 120 mg
- Sugar: 18 g
- Fiber: 1 g
Nutrition values are approximate and may vary depending on the brands of ingredients used.
Recipe Notes
- Room-temperature ingredients mix more evenly and produce a smoother dough.
- Chilling the dough is recommended for the best bakery-style texture.
- For picture-perfect cookies, add a few extra chocolate chunks on top before baking.
- Sprinkle flaky sea salt over warm cookies to enhance the chocolate and caramel flavors.
- Let the cookies cool for several minutes before serving so the centers can set while remaining soft and chewy.