Few baking projects are as satisfying as creating homemade puff pastry from scratch. Watching thin layers of dough rise into crisp, golden sheets in the oven is a rewarding experience for both beginner and experienced bakers. While traditional puff pastry depends on wheat flour and gluten to create structure, this Gluten-Free Puff Pastry Recipe proves that you can enjoy the same flaky texture and buttery flavor without using regular flour.
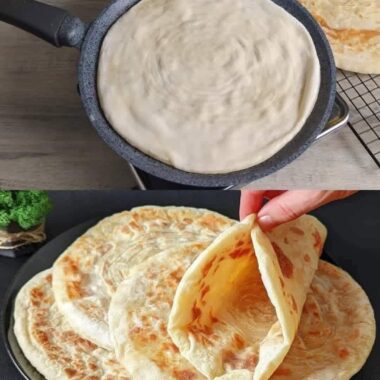
This recipe is carefully designed to create delicate layers that puff beautifully while remaining crisp on the outside and light inside. Every fold of butter and dough contributes to the airy structure that makes puff pastry famous around the world. Once baked, the pastry develops dozens of golden layers that separate easily with every bite, making it perfect for both sweet desserts and savory recipes.
Whether you’re planning elegant fruit turnovers, flaky breakfast pastries, homemade sausage rolls, appetizer bites, or delicious tart shells, this versatile dough provides the ideal foundation. Learning the lamination process may seem challenging at first, but with patience and proper chilling, you’ll discover that homemade gluten-free puff pastry is easier than many people imagine.
Why This Gluten-Free Puff Pastry Recipe Is Worth Making
Many packaged gluten-free pastries can be expensive, difficult to find, or lacking in texture. Homemade pastry allows you to enjoy fresher ingredients, better flavor, and complete control over quality.
Unlike many gluten-free doughs that become dense or gummy after baking, this recipe creates crisp, delicate layers that closely resemble classic bakery puff pastry.
The dough can also be prepared ahead of time, making it ideal for meal planning and holiday baking. Once stored in the freezer, it becomes a convenient ingredient for quick homemade treats whenever inspiration strikes.
Because this recipe uses pantry-friendly ingredients, it is practical for everyday baking while still producing impressive results suitable for entertaining guests.
Understanding the Magic Behind Puff Pastry
One of the most fascinating aspects of puff pastry is that it contains no yeast.
Instead, its impressive height comes entirely from steam.
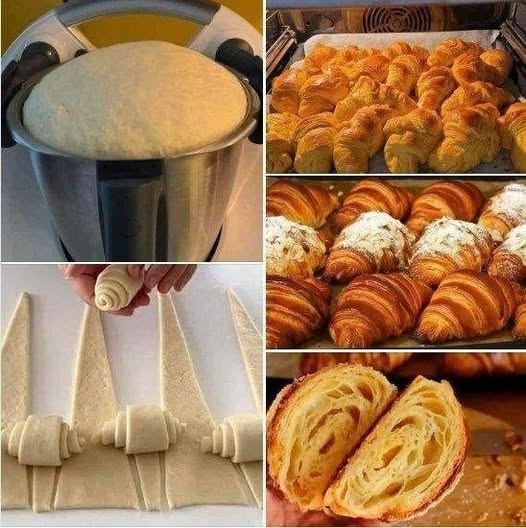
During preparation, cold butter is repeatedly folded between thin layers of dough through a process called lamination.
As the pastry enters a hot oven, the moisture inside the butter rapidly converts to steam.
That steam pushes each dough layer upward, separating them into hundreds of delicate sheets.
The result is a beautifully crisp pastry with remarkable height and irresistible flakiness.
Maintaining distinct butter layers throughout preparation is the secret to successful puff pastry.
Why Gluten-Free Puff Pastry Can Be Challenging
Traditional wheat flour naturally develops gluten, giving dough flexibility and strength.
Gluten-free flour behaves differently because it lacks this elastic protein network.
Fortunately, carefully balanced gluten-free flour blends containing rice flour, starches, and xanthan gum can successfully mimic many of gluten’s structural qualities.
The goal is to create dough that remains sturdy enough to hold butter layers while still rolling smoothly during lamination.
Following proper chilling times is especially important because gluten-free dough softens more quickly than traditional pastry.
A Closer Look at the Ingredients
Each ingredient has an important purpose.
Gluten-Free All-Purpose Flour
A quality gluten-free flour blend forms the foundation of the dough.
Blends containing xanthan gum usually perform best because the binder improves elasticity and reduces cracking during rolling.
Salt
Salt strengthens the dough while enhancing overall flavor.
Even a small amount significantly improves the finished pastry.
Sugar
Only a small quantity of sugar is needed.
It contributes subtle flavor while encouraging attractive browning during baking.
Apple Cider Vinegar
Vinegar tenderizes the dough and improves flexibility, making repeated rolling and folding easier.
Fresh lemon juice may also be used as an alternative if desired.
Cold Water
Ice-cold water keeps the butter from melting during mixing.
Maintaining low temperatures is essential for successful lamination.
Unsalted Butter
Butter creates every flaky layer inside the pastry.
Using high-quality butter with a higher fat content often produces superior flavor and more dramatic puff.
Egg Wash
Brushing the tops with egg wash before baking creates a glossy golden finish while improving presentation.
Care should be taken not to let the egg wash run down the sides, which may seal the layers together.
What Is Lamination?
Lamination refers to repeatedly folding butter inside dough to create alternating layers.
Each fold dramatically increases the number of layers inside the pastry.
After several turns, hundreds of delicate sheets develop throughout the dough.
When baked, these layers separate naturally through steam, creating the classic flaky texture associated with premium puff pastry.
Although lamination requires patience, each step is simple when completed carefully.
Professional pastry chefs constantly monitor dough temperature during preparation.
Warm butter blends into the dough instead of remaining in separate layers.
Cold butter stays intact, producing the steam pockets needed for puffing.
If the dough ever begins feeling soft or sticky, refrigeration becomes the best solution.
Short chilling periods between folds help maintain distinct layers while making rolling much easier.
Patience during chilling consistently rewards bakers with noticeably better results.
Helpful Rolling Tips
Roll gently using even pressure.
Always work from the center outward rather than pressing aggressively.
Turn the dough occasionally to prevent sticking.
Dust the surface lightly with gluten-free flour as needed without adding excessive flour.
Too much extra flour may dry the pastry.
Keeping movements smooth and controlled protects the butter layers inside.
Cutting Puff Pastry Correctly
Many people accidentally reduce the pastry’s rise by cutting it incorrectly.
Always use a sharp knife or pastry cutter.
Press straight downward instead of dragging through the dough.
Dragging seals the edges together, preventing steam from lifting the layers.
Clean cuts allow the pastry to expand freely inside the oven.
Baking for Maximum Rise
A fully preheated oven is essential.
High temperatures immediately transform butter moisture into steam before the butter leaks out.
Avoid opening the oven during the early stages of baking.
Sudden temperature drops may interrupt rising and reduce flakiness.
The pastry should bake until deeply golden with crisp, fully developed layers.
Proper baking creates beautiful height and satisfying crunch.
Creative Ways to Use Homemade Puff Pastry
Once prepared, this dough becomes incredibly versatile.
Use it to prepare:
- Fruit turnovers
- Apple pastries
- Berry-filled pockets
- Chocolate pastries
- Breakfast Danish
- Sausage rolls
- Savory hand pies
- Cheese twists
- Mini quiches
- Puff pastry pizzas
- Tart shells
- Cream-filled desserts
- Holiday appetizers
- Party snacks
Because the dough freezes well, preparing multiple batches saves valuable time during busy holidays.
Storage and Make-Ahead Convenience
Homemade gluten-free puff pastry stores exceptionally well.
Wrap tightly and refrigerate raw dough for several days before baking.
Freeze rolled sheets or individual pastry portions for longer storage.
Prepared pastries can often be baked directly from frozen by extending baking time slightly.
Having homemade pastry ready in the freezer makes last-minute baking surprisingly simple.
Final Thoughts
Making Gluten-Free Puff Pastry from scratch is a rewarding baking skill that opens the door to countless sweet and savory recipes. Although the folding process requires patience, the final results are well worth the effort. Crisp, buttery layers, beautiful golden color, and bakery-quality texture prove that gluten-free baking can be every bit as impressive as traditional pastry.
With proper chilling, careful rolling, and quality ingredients, you’ll create homemade puff pastry that performs beautifully in everything from elegant desserts to comforting family meals. Once you’ve mastered this versatile dough, you’ll enjoy endless opportunities to create delicious baked treats without compromising on texture or flavor.
Part 2 – Easy Gluten-Free Puff Pastry Recipe
Homemade Gluten-Free Puff Pastry
This homemade Gluten-Free Puff Pastry is light, buttery, and wonderfully flaky, making it perfect for both sweet and savory recipes. Using a simple lamination technique and a few pantry ingredients, you can create crisp pastry layers that bake beautifully for turnovers, tarts, sausage rolls, hand pies, breakfast pastries, and more.
Recipe Information
- Prep Time: 40 Minutes
- Chilling Time: About 3 Hours
- Bake Time: 18–22 Minutes
- Total Time: Approximately 4 Hours
- Servings: Makes about 2 pastry sheets
- Course: Baking, Pastry
- Cuisine: French-Inspired
- Difficulty: Intermediate
- Diet: Gluten-Free
Ingredients
For the Dough
- 2¼ cups gluten-free all-purpose flour (with xanthan gum)
- 1 teaspoon fine salt
- 1 teaspoon granulated sugar
- 1 teaspoon apple cider vinegar
- ¾ cup very cold water
For the Butter Layer
- 1¼ cups cold unsalted butter
Egg Wash
- 1 large egg
- 1 tablespoon water
Optional Additions
- Extra gluten-free flour for dusting
- ½ teaspoon xanthan gum (only if your flour blend does not already contain it)
- 1 teaspoon honey mixed into the egg wash for a deeper golden finish (optional)
Kitchen Equipment
- Large mixing bowl
- Measuring cups and spoons
- Rolling pin
- Plastic wrap
- Parchment paper
- Sharp knife or pastry cutter
- Baking tray
- Pastry brush
- Cooling rack
Instructions
Step 1 – Prepare the Dough
In a large mixing bowl, whisk together:
- Gluten-free flour
- Salt
- Sugar
In a separate measuring cup, stir the apple cider vinegar into the cold water.
Slowly pour the liquid into the dry ingredients while mixing until a firm dough forms.
Shape the dough into a rectangle.
Wrap tightly with plastic wrap and refrigerate for 30 minutes.
Step 2 – Make the Butter Block
Place the cold butter between two sheets of parchment paper.
Using a rolling pin, gently flatten it into a rectangle about 6 × 8 inches and approximately ½ inch thick.
Refrigerate for 10–15 minutes until firm but still flexible.
Step 3 – Enclose the Butter
Lightly dust your work surface with gluten-free flour.
Roll the chilled dough into an 8 × 12-inch rectangle.
Place the butter block in the center.
Fold the dough over the butter like an envelope, making sure the butter is completely sealed inside.
Press the seams closed gently.
Step 4 – First Lamination
Roll the dough into a long rectangle approximately 8 × 20 inches.
Roll in one direction whenever possible.
Fold the dough into thirds like a business letter.
Rotate it 90 degrees.
Wrap tightly and refrigerate for 30 minutes.
This completes the first turn.
Step 5 – Repeat the Turns
Repeat the rolling, folding, rotating, and chilling process four more times, making a total of five turns.
Always refrigerate the dough for 30 minutes between each turn.
After completing the final turn, refrigerate the dough for at least 1 hour before using.
Step 6 – Shape the Pastry
Roll the chilled dough to approximately ¼ inch thickness.
Use a sharp knife or pastry cutter to make clean cuts.
Avoid dragging the blade through the dough, as this can seal the edges and reduce the rise.
Shape according to your chosen recipe.
Step 7 – Apply the Egg Wash
Whisk together:
- 1 egg
- 1 tablespoon water
Lightly brush only the tops of the pastries.
Do not allow the egg wash to drip onto the sides.
Step 8 – Bake
Preheat the oven to 425°F (220°C).
Arrange the pastries on a parchment-lined baking sheet.
Bake for 18–22 minutes, or until:
- Deep golden brown
- Crisp and flaky
- Fully puffed with visible layers
Cool slightly before serving.
Expert Baking Tips
- Keep the butter cold throughout the entire process.
- Chill the dough whenever it starts to soften.
- Use a sharp knife for clean edges.
- Avoid pressing down on the pastry after shaping.
- Always bake in a fully preheated oven.
- Use high-quality butter for richer flavor and better layering.
Serving Suggestions
Use this puff pastry to make:
- Fruit turnovers
- Apple pastries
- Chocolate-filled pastries
- Breakfast Danish
- Savory hand pies
- Sausage rolls
- Cheese twists
- Puff pastry pizzas
- Mini tarts
- Cream-filled pastries
- Appetizers
- Holiday party snacks
Storage Instructions
Refrigerator
Wrap tightly and refrigerate the raw dough for up to 3 days.
Freezer
Freeze the dough for up to 2 months.
You can also freeze shaped, unbaked pastries.
Bake directly from frozen by adding 3–4 extra minutes to the baking time.
Baked Pastries
Store baked pastries in an airtight container at room temperature for 1–2 days.
Reheat in a 350°F (175°C) oven for several minutes to restore crispness.
Recipe Variations
- Fill with cream cheese and berries.
- Make savory spinach and cheese pockets.
- Add chocolate for dessert pastries.
- Use apple or pear filling for seasonal treats.
- Prepare homemade sausage rolls.
- Create mini fruit tarts.
- Sprinkle cinnamon sugar before baking for sweet pastries.
Approximate Nutrition (Per Serving)
- Calories: 240
- Protein: 2g
- Fat: 18g
- Carbohydrates: 18g
- Fiber: 1g
- Sugar: 1g
- Sodium: 190mg
Nutrition values are approximate and will vary depending on the flour blend, butter brand, and recipe used.
Frequently Asked Questions
Can I freeze the dough?
Yes. Wrap it tightly in plastic wrap and place it in a freezer-safe bag for up to 2 months.
Can I use frozen butter?
Very cold butter is ideal, but it should still be flexible enough to roll without cracking.
Why didn’t my pastry puff?
The butter may have become too warm during preparation, or the oven may not have been fully preheated.
Can I make this dairy-free?
Yes. Replace the butter with a high-quality dairy-free baking block. Results may vary slightly depending on the product used.
Do I need xanthan gum?
Only if your gluten-free flour blend does not already include it.
Why You’ll Love This Recipe
- Easy homemade gluten-free puff pastry
- Crisp, flaky bakery-style layers
- Perfect for sweet and savory baking
- Freezer-friendly
- Great for meal prep
- Beginner-friendly lamination method
- Simple pantry ingredients
- Versatile for countless recipes
Disclaimer
This recipe is intended for general informational purposes only. Nutrition values are approximate and may vary based on ingredient brands, preparation methods, and serving sizes. Always check product labels if you have food allergies or dietary restrictions.