There’s something timeless about the flavor of cherries baked into a rich, buttery dessert. Whether it’s served at a family gathering, holiday celebration, summer picnic, or afternoon coffee break, a homemade cherry dessert always feels comforting and special. If you’re looking for an easier alternative to traditional pie, these Cherry Pie Bars are the perfect solution. They deliver all the sweet, fruity goodness of classic cherry pie in a convenient bar form that’s simple to prepare, easy to serve, and ideal for sharing.
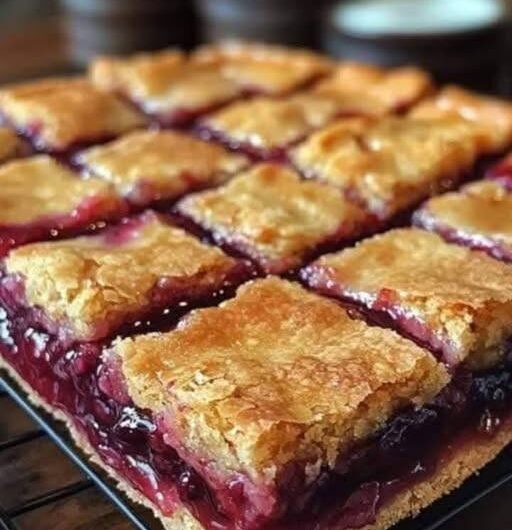
Unlike a traditional pie that requires rolling, shaping, and crimping pastry, these dessert bars come together in one baking pan. A soft, buttery dough creates both the base and the crumbly topping, while a layer of sweet cherry pie filling adds vibrant color and irresistible flavor. Once baked to golden perfection and finished with a light vanilla glaze, every square offers a delicious combination of tender crust, juicy fruit, and a sweet finishing touch.
This easy Cherry Pie Bars recipe is a favorite among home bakers because it combines simple pantry ingredients with a bakery-style result. It’s an excellent dessert for beginners, yet impressive enough to serve at birthdays, potlucks, family dinners, bake sales, or festive celebrations. Since the bars can be prepared in advance, they’re also a practical choice when entertaining guests or planning holiday menus.
Whether you love classic fruit desserts or you’re searching for a new homemade treat to enjoy throughout the year, these cherry bars are guaranteed to become a recipe you’ll return to again and again.
Why You’ll Love These Homemade Cherry Pie Bars
One of the best things about this recipe is its simplicity. It offers all the familiar flavors of a homemade cherry pie without the extra work of making and shaping a traditional pie crust.
The buttery dough is soft enough to spread easily into the baking pan while remaining sturdy enough to support the cherry filling. During baking, the top develops a lightly golden finish with crisp edges and a tender interior, creating the perfect contrast to the juicy fruit layer.
Another reason these dessert bars are so popular is their convenience. Because they are baked in a rectangular pan and cut into squares, they are easy to transport and serve, making them ideal for parties, school events, holiday cookie trays, or casual family desserts.
They also store well, making them an excellent make-ahead dessert for busy schedules.
What Makes Cherry Pie Bars Different from Traditional Cherry Pie?
Although inspired by the classic American cherry pie, these bars have their own unique appeal.
Traditional pies usually require two carefully rolled pastry crusts, which can be intimidating for beginner bakers. Cherry pie bars simplify the process by using a rich butter-based dough that serves as both the bottom crust and the crumbly topping.
The result is a dessert with a texture somewhere between shortbread and soft cake. The buttery base remains tender while supporting the sweet cherry filling beautifully.
Instead of slicing wedges, the finished dessert is cut into neat squares, making it easier to portion and serve at gatherings.
Every bite contains the perfect balance of crust, fruit, and glaze.
The Secret Behind the Soft, Buttery Crust
The crust is one of the highlights of this recipe.
Rather than using a flaky pastry dough, these bars feature a rich butter dough that bakes into a tender, melt-in-your-mouth layer.
Softened butter provides richness while helping create a delicate crumb.
Granulated sugar adds sweetness and contributes to the light golden color that develops during baking.
Eggs give the dough structure and softness, ensuring each bar remains moist while still holding its shape after cooling.
Vanilla extract enhances the buttery flavor, while almond extract—although optional—adds a subtle bakery-style aroma that pairs beautifully with cherries.
All-purpose flour forms the foundation of the dough, and a small amount of salt balances the sweetness while enhancing the overall flavor.
Why Cherry Filling Is the Star of the Recipe
The vibrant cherry layer brings both flavor and visual appeal to these dessert bars.
Cherry pie filling offers a sweet-tart balance that contrasts perfectly with the rich buttery crust.
As the bars bake, the filling thickens slightly and settles into the dough, creating juicy pockets of fruit throughout every serving.
Using prepared cherry pie filling also makes the recipe much quicker and easier, especially when preparing desserts for special occasions.
If you enjoy homemade baking, you can also substitute homemade cherry filling prepared with fresh or frozen cherries while keeping the same delicious result.
The bright red cherries create a beautiful contrast against the golden crust, making these bars just as attractive as they are delicious.
Why Almond and Vanilla Work So Well Together
One of the secrets behind many bakery-style fruit desserts is the combination of vanilla and almond extracts.
Vanilla contributes warmth and sweetness, creating a familiar homemade flavor.
Almond extract complements cherries particularly well because their flavor profiles naturally enhance one another.
Even a small amount creates a richer aroma that makes the finished bars taste more complex and elegant.
If preferred, the almond extract can be omitted, but many bakers consider it one of the ingredients that makes cherry desserts especially memorable.
A Dessert for Every Season
Although cherries are often associated with summer, these bars are delicious all year long.
During spring and summer, they make a refreshing dessert for outdoor picnics, family reunions, graduation parties, and backyard barbecues.
In autumn, they fit beautifully alongside other baked treats at potlucks and community events.
Throughout the holiday season, their vibrant red filling makes them an attractive addition to Christmas cookie trays, dessert buffets, and festive gatherings.
Because canned cherry pie filling is available year-round, you can enjoy this recipe whenever the craving strikes.
Perfect for Parties, Potlucks, and Bake Sales
One reason these bars continue to grow in popularity is their practicality.
Unlike pies that require careful slicing, dessert bars are easy to cut into equal portions.
They stack neatly on serving trays, travel well, and are simple for guests to enjoy without additional utensils.
Their colorful appearance also makes them stand out on dessert tables filled with cookies, brownies, and cakes.
Whether you’re hosting guests or bringing a dessert to share, Cherry Pie Bars offer both convenience and homemade flavor in every bite.
Baking Tips for the Best Results
A few simple techniques can help ensure success every time you make these bars.
Allow the butter to soften naturally before mixing so it creams smoothly with the sugar.
Add the eggs one at a time to create a light, even batter.
Avoid overmixing once the flour has been added, as this helps keep the crust tender.
Spread the bottom layer evenly into the baking pan so the bars bake uniformly.
When adding the remaining dough over the cherry filling, small spoonfuls are perfectly fine. The topping doesn’t need to completely cover the fruit because it spreads slightly while baking and creates a beautiful rustic appearance.
Finally, allow the bars to cool completely before adding the glaze and cutting into squares. This helps the filling set properly and creates cleaner slices.
A Dessert That’s Easy to Customize
Another reason this recipe remains a favorite is its versatility.
While cherries create the classic version, the same buttery base can be paired with many different fruit fillings depending on the season or personal preference.
Blueberry, raspberry, apple, peach, blackberry, or mixed berry fillings all work wonderfully with this style of dessert.
A handful of sliced almonds sprinkled over the top before baking can add extra crunch, while a light dusting of powdered sugar offers a simple finishing touch if you prefer to skip the glaze.
No matter how you serve them, these homemade Cherry Pie Bars combine buttery richness, fruity sweetness, and classic comfort into one easy-to-make dessert that’s sure to impress family and friends alike.
Part 2
Easy Cherry Pie Bars Recipe
Recipe Overview
These Cherry Pie Bars are a simple, crowd-pleasing dessert featuring a buttery homemade crust, a layer of sweet cherry filling, and a soft golden topping finished with a delicate vanilla glaze. They’re an easy alternative to traditional cherry pie and are perfect for holidays, bake sales, potlucks, family gatherings, or whenever you’re craving a fruity homemade treat.
Recipe Details
Prep Time: 15 minutes
Bake Time: 35–40 minutes
Total Time: 55 minutes
Servings: 24 bars
Difficulty: Easy
Ingredients
For the Buttery Dough
- 1 cup unsalted butter, softened
- 1¾ cups granulated sugar
- 4 large eggs
- 1 teaspoon pure vanilla extract
- ½ teaspoon almond extract (optional, for enhanced cherry flavor)
- 3 cups all-purpose flour
- ½ teaspoon salt
For the Cherry Layer
- 1 (21-ounce) can cherry pie filling
- 1 teaspoon freshly grated lemon zest (optional, for a brighter flavor)
Optional Vanilla Glaze
- 1 cup powdered sugar
- 1–2 tablespoons milk or heavy cream
- ½ teaspoon pure vanilla extract
Optional Garnishes
- Sliced almonds
- Fresh cherries
- Powdered sugar
- Whipped cream
- Vanilla ice cream
Step-by-Step Instructions
Step 1: Prepare the Baking Pan
Preheat your oven to 350°F (175°C).
Lightly grease a 9×13-inch baking dish or line it with parchment paper for easier removal and cleanup.
Step 2: Make the Dough
In a large mixing bowl, beat the softened butter and granulated sugar until the mixture becomes light and fluffy.
Add the eggs one at a time, mixing well after each addition.
Stir in the vanilla extract and almond extract, if using.
Gradually mix in the flour and salt until a soft, smooth dough forms. Avoid overmixing.
Step 3: Create the Bottom Layer
Spread about two-thirds of the dough evenly into the prepared baking pan, using a spatula or lightly floured hands to smooth the surface.
Step 4: Add the Cherry Filling
Spoon the cherry pie filling evenly over the dough.
If desired, sprinkle the lemon zest over the cherries for a fresh citrus note.
Spread the filling gently without disturbing the crust.
Step 5: Finish with the Topping
Drop small spoonfuls of the remaining dough over the cherry filling.
The fruit does not need to be completely covered—the open spaces create a beautiful rustic appearance as the bars bake.
Step 6: Bake
Place the pan in the preheated oven.
Bake for 35–40 minutes, or until the top turns lightly golden and the center is fully set.
Remove from the oven and allow the bars to cool completely before glazing.
Step 7: Prepare the Glaze
In a small bowl, whisk together:
- Powdered sugar
- Milk or heavy cream
- Vanilla extract
Mix until smooth.
If the glaze is too thick, add a few extra drops of milk. If it’s too thin, add a little more powdered sugar.
Step 8: Decorate and Serve
Drizzle the glaze over the cooled bars.
Allow the glaze to set for several minutes before slicing into squares.
Serve and enjoy.
Serving Suggestions
These Cherry Pie Bars taste wonderful with:
- Vanilla ice cream
- Fresh whipped cream
- Hot coffee
- Tea
- Fresh berries
- A dusting of powdered sugar
- Toasted sliced almonds
They’re equally delicious served chilled or at room temperature.
Helpful Baking Tips
- Use room-temperature butter for easier mixing.
- Don’t overmix the dough after adding the flour.
- Cool the bars completely before glazing and slicing.
- Line the baking pan with parchment paper for easy removal.
- Chill the bars for cleaner, neater slices if desired.
Easy Flavor Variations
Mixed Berry Bars
Replace the cherry filling with mixed berry pie filling.
Blueberry Version
Use blueberry pie filling for a delicious fruity twist.
Apple Cinnamon Bars
Substitute apple pie filling and add a pinch of cinnamon.
Raspberry Dessert Bars
Swap in raspberry pie filling for a sweet-tart flavor.
Almond Crunch
Sprinkle sliced almonds over the top before baking for extra texture.
Storage Instructions
Room Temperature
Store in an airtight container for up to 2 days.
Refrigerator
Keep refrigerated for up to 5 days.
Serve chilled or bring to room temperature before enjoying.
Freezer
Wrap individual bars or the entire batch tightly and freeze for up to 3 months.
Thaw overnight in the refrigerator before serving.
Frequently Asked Questions
Can I use homemade cherry pie filling?
Yes. Homemade cherry filling made with fresh or frozen cherries works beautifully in this recipe.
Can I prepare these bars in advance?
Absolutely. They’re an excellent make-ahead dessert and often taste even better after resting overnight.
Can I freeze Cherry Pie Bars?
Yes. Freeze them in an airtight container for up to three months.
Can I use another fruit filling?
Certainly. Blueberry, raspberry, blackberry, peach, or apple pie filling are all delicious alternatives.
What pairs well with Cherry Pie Bars?
Serve them with vanilla ice cream, whipped cream, fresh berries, or a warm cup of coffee for a classic dessert experience.
Approximate Nutrition (Per Bar)
- Calories: 220
- Carbohydrates: 30g
- Protein: 3g
- Fat: 10g
- Saturated Fat: 6g
- Sugar: 18g
- Fiber: 1g
- Sodium: 85mg
Nutrition values are approximate and may vary depending on ingredient brands and serving size.
Final Thoughts
These Easy Cherry Pie Bars combine the rich flavor of buttery homemade pastry with sweet cherry filling in a simple, shareable dessert that’s perfect for every occasion. With easy preparation, beautiful presentation, and classic fruit flavor, they’re a wonderful alternative to traditional pie and are sure to become a favorite recipe for holidays, potlucks, family dinners, and everyday baking.