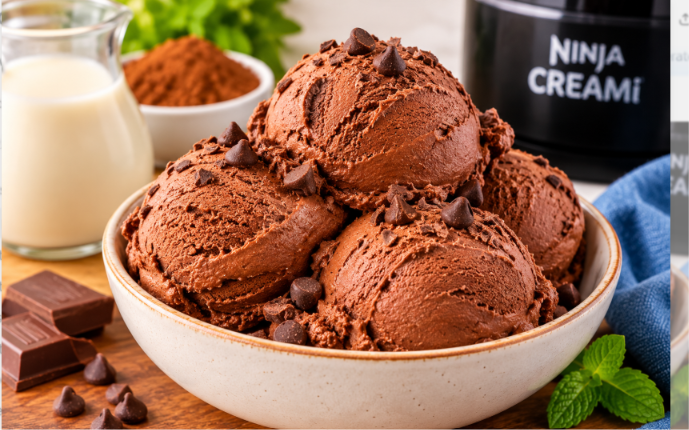
If you enjoy chocolate ice cream but want to keep your carbohydrate intake low, this Ninja Creami Keto Chocolate Ice Cream is a delicious dessert worth adding to your collection. It delivers a rich chocolate flavor, a smooth texture, and satisfying creaminess without relying on traditional sugar. Made with unsweetened almond milk, heavy cream, Dutch cocoa powder, and a keto-friendly sweetener, this homemade frozen dessert is simple to prepare and requires only a handful of ingredients. The Ninja Creami machine transforms the frozen mixture into a creamy dessert that feels similar to traditional chocolate ice cream. Whether you follow a ketogenic eating plan, reduce added sugar, or simply enjoy making homemade desserts, this easy recipe offers a convenient way to enjoy chocolate ice cream at home.
2. Why You Will Love This Easy Keto Chocolate Ice Cream Recipe
There are several reasons this homemade keto chocolate ice cream deserves a place in your dessert rotation. One of its biggest advantages is the straightforward preparation. You do not need to cook a custard, prepare an egg-based ice cream mixture, or spend time churning ingredients on the stovetop. Simply blend the ingredients, freeze the mixture in a Ninja Creami pint container, and process it when you are ready to enjoy dessert. Another advantage is the use of low-carbohydrate ingredients, which makes this recipe suitable for many people following a keto lifestyle. The combination of heavy cream and Dutch cocoa powder creates a rich chocolate taste, while allulose or Swerve provides sweetness without using regular granulated sugar. You can also customize the finished ice cream with optional chocolate chips or other favorite additions.
3. What Is Ninja Creami Keto Chocolate Ice Cream?
Ninja Creami Keto Chocolate Ice Cream is a homemade frozen dessert prepared with a special ice cream machine that processes frozen ingredients into a smooth, scoopable consistency. Unlike conventional ice cream recipes that require continuous churning while freezing, this method allows you to prepare the base ahead of time and freeze it for approximately 24 hours. When the mixture is completely frozen, the Ninja Creami processes it using its Light Ice Cream setting. The machine breaks down the frozen mixture and creates a texture that resembles traditional ice cream. This particular version uses almond milk, heavy cream, a low-carbohydrate sweetener, and Dutch cocoa powder to create a chocolate-flavored base. The result is a creamy dessert with a rich cocoa taste and a lower carbohydrate content than many conventional chocolate ice cream options.
4. Choosing the Right Almond Milk for a Keto Dessert
Unsweetened almond milk is one of the main ingredients in this recipe because it provides liquid for the ice cream base without adding the carbohydrates commonly found in regular dairy milk. Its mild flavor allows the chocolate and cream to remain the main focus of the dessert. When shopping, choose an unsweetened variety rather than vanilla-flavored or sweetened almond milk, as those products may contain additional sugar or carbohydrates. Check the nutrition label before purchasing because different brands can have different nutritional values. Almond milk also helps balance the richness of heavy cream, preventing the mixture from becoming excessively thick before freezing. Using the specified three-quarter cup quantity helps maintain the intended balance between the liquid and creamy ingredients. Measure it carefully to keep the base consistent.
5. Why Heavy Cream Creates a Rich and Creamy Texture
Heavy cream plays an important role in giving this Ninja Creami chocolate ice cream its smooth and luxurious consistency. The recipe uses three-quarter cup of heavy cream, which contributes most of the fat in the dessert. Fat helps create a rich mouthfeel and balances the lighter consistency of almond milk. It also complements the deep flavor of Dutch cocoa powder, producing a chocolate dessert that tastes satisfying even without traditional sugar. Heavy cream is particularly useful in homemade keto ice cream because it provides richness while keeping the carbohydrate content relatively low. For the best result, measure the cream accurately and blend it with the remaining ingredients until the mixture is evenly combined. Avoid using a substantially different cream product without checking its fat and carbohydrate content, as substitutions can affect both texture and nutritional values.
6. The Importance of Dutch Cocoa Powder
Dutch cocoa powder gives this recipe its distinctive chocolate flavor. Unlike some natural cocoa powders, Dutch-processed cocoa is treated to create a smoother, less acidic flavor profile. This makes it an excellent choice for rich chocolate desserts, especially when combined with heavy cream and a low-carbohydrate sweetener. The recipe calls for two tablespoons of Dutch cocoa powder, which provides a noticeable chocolate taste without overwhelming the other ingredients. When measuring cocoa powder, use a spoon to transfer it into the measuring tablespoon rather than packing it tightly. This helps create a more consistent measurement. Choose unsweetened Dutch cocoa powder so that you can control the sweetness through your selected sweetener. A good-quality cocoa powder can make a noticeable difference in the flavor of the finished frozen dessert.
7. Selecting the Best Keto-Friendly Sweetener
The recipe allows you to use either allulose or Swerve as the sweetener. Both are commonly used in reduced-sugar and keto-style desserts, but they can behave differently in frozen recipes. Allulose is often appreciated for its ability to produce a softer frozen texture compared with some other sugar substitutes. Swerve is another popular option for people looking to reduce regular sugar in homemade desserts. The sweetness and texture may vary depending on the specific product and formulation. For this recipe, use the stated quarter-cup quantity and follow the product’s serving and measurement guidance. If you prefer a different keto-friendly sweetener, monk fruit-based alternatives may also be considered, although the final texture and sweetness can change. Choosing a sweetener you enjoy is important because it directly influences the overall chocolate flavor.
8. How Sugar-Free Vanilla Extract Enhances Chocolate Flavor
Although vanilla is often associated with vanilla-flavored desserts, a small amount can improve the overall taste of chocolate ice cream. This recipe includes one teaspoon of sugar-free vanilla extract to add warmth and roundness to the chocolate flavor. Vanilla does not need to dominate the dessert to make a difference. Instead, it works in the background, helping balance the cocoa and cream. Choose a sugar-free product and check its ingredients if you are carefully tracking carbohydrates. The vanilla extract is blended directly into the ice cream base, so there is no additional preparation required. When combined with the almond milk, heavy cream, cocoa powder, and sweetener, it creates a balanced chocolate mixture that is ready for freezing.
9. Preparing the Ninja Creami Chocolate Ice Cream Base
The first practical step is preparing a smooth mixture before freezing. Add the unsweetened almond milk, heavy cream, sweetener, Dutch cocoa powder, and sugar-free vanilla extract to a blender. Blend until the cocoa powder is fully incorporated and the sweetener is evenly distributed. Pay attention to the sides and bottom of the blender because cocoa powder can sometimes stick to the surface rather than mixing completely. If necessary, stop the blender and scrape down the sides before blending briefly again. The mixture should have a consistent chocolate color without visible dry cocoa powder or large sweetener clumps. Avoid blending longer than necessary, particularly because excessive mixing of cream can affect its texture. Once the base is smooth, it is ready to be transferred into the Ninja Creami container.
10. How to Freeze the Ice Cream Mixture Correctly
Freezing is an essential part of making Ninja Creami keto chocolate ice cream. Pour the prepared chocolate mixture into the Ninja Creami pint container, making sure not to exceed the container’s maximum fill line. Leaving sufficient space is important because the machine requires the mixture to fit correctly during processing. Secure the container according to the manufacturer’s instructions and place it on a flat surface inside the freezer. Freeze the mixture for at least 24 hours before processing. A level surface helps the mixture freeze evenly and reduces the possibility of an uneven frozen surface. Avoid shortening the freezing period because an incompletely frozen base may not process as intended. Planning ahead is useful: prepare the mixture the previous day so that it is completely frozen and ready whenever you want a homemade chocolate dessert.
11. Processing the Frozen Base in the Ninja Creami
After the mixture has frozen for 24 hours, remove the pint container from the freezer and allow it to sit at room temperature for a few minutes. Follow the machine’s preparation and safety instructions before placing the container into the processing bowl. Select the Light Ice Cream setting to process the frozen chocolate mixture. During the first cycle, the dessert may look powdery or crumbly rather than smooth. This does not necessarily mean the recipe has failed. Frozen mixtures sometimes require additional processing to develop their final consistency. Instead of repeating the original Light Ice Cream program, use the Re-spin function as needed. The recipe recommends approximately two to three re-spins until the texture becomes creamy. The exact number can vary depending on the machine and how the mixture has frozen.
12. How to Fix Powdery Ninja Creami Ice Cream
A powdery texture is a common concern when preparing frozen desserts in the Ninja Creami. The first processing cycle may leave small frozen particles instead of producing a smooth ice cream consistency. The recommended solution for this recipe is to use the Re-spin function two to three times. This gives the machine additional opportunities to process the frozen base into a smoother texture. If the ice cream remains powdery after a couple of re-spins, add approximately one tablespoon of almond milk and process again if needed. Avoid adding too much liquid because excess moisture can affect the final consistency. It is also important not to use the Light Ice Cream setting repeatedly when the mixture is already processed once. Following the recommended re-spin method is a simple way to improve the texture without changing the entire recipe.
13. Adding Keto Chocolate Chips and Other Mix-Ins
Once the ice cream has reached your preferred consistency, you can add optional keto-friendly dark chocolate chips. These provide small bursts of chocolate flavor and introduce a pleasant contrast to the smooth ice cream. Place the chocolate chips into the processed mixture and select the Mix-In function on your Ninja Creami machine. Allow the machine to distribute the additions through the dessert. You can also experiment with other low-carbohydrate additions, such as chopped nuts, unsweetened coconut flakes, or a peanut butter swirl. Keep in mind that additional ingredients will change the nutritional information, especially the calorie and carbohydrate totals. If you are carefully monitoring your daily intake, measure optional toppings rather than adding them without checking the quantities.
14. Making Keto Chocolate Ice Cream Without a Ninja Creami
You can still prepare a version of this chocolate dessert if you do not own a Ninja Creami machine. The alternative method uses a regular freezer-safe container and a small amount of guar gum to help improve the texture. Begin by mixing the original ice cream ingredients in a bowl until they are evenly combined. Add one-quarter teaspoon of guar gum and mix thoroughly so that it is distributed throughout the base. Pour the mixture into a suitable freezer-safe container and place it in the freezer for approximately two to three hours. Before serving, remove the container and allow the ice cream to soften at room temperature for around 10 to 15 minutes. The final consistency may differ from the Ninja Creami version, but this method offers another way to enjoy homemade low-carb chocolate ice cream without specialized equipment.
15. Tips for Getting the Best Homemade Keto Ice Cream
A few preparation details can help improve your results. First, avoid overmixing the heavy cream in the blender because excessive blending can affect its texture. Blend only until the cocoa powder and other ingredients are fully combined. Second, do not fill the Ninja Creami container beyond its maximum fill line. The mixture needs the appropriate amount of space during processing. Third, remember that a powdery result after the first cycle can usually be improved with the Re-spin function. If the texture still needs attention after a couple of re-spins, try adding one tablespoon of almond milk rather than pouring in a large amount of liquid. Finally, make sure the base has frozen for the full 24 hours. These small details can make the preparation process more predictable and help produce a smoother frozen dessert.
16. How to Store Ninja Creami Keto Chocolate Ice Cream
If you do not finish the entire batch, you can store the remaining ice cream in the Ninja Creami pint container. Smooth the surface as much as possible, secure the lid, and place the container on a flat surface in the freezer. Keeping the dessert covered helps protect it from freezer odors and unwanted moisture. When you want another serving, follow the Ninja Creami manufacturer’s instructions for processing previously frozen leftovers. The texture may become firm during storage, so additional processing may be necessary to restore a softer consistency. Avoid repeatedly leaving the ice cream at room temperature for extended periods. Instead, remove only the portion you plan to serve and return the remaining container to the freezer promptly.
17. Is Keto Chocolate Ice Cream Suitable for a Low-Carb Lifestyle?
This recipe is designed with low-carbohydrate ingredients, making it a useful dessert option for people following a keto-style eating plan. Unsweetened almond milk, heavy cream, Dutch cocoa powder, and a keto-friendly sweetener replace the regular milk and sugar commonly found in conventional chocolate ice cream. The supplied nutritional information lists approximately three grams of total carbohydrates and 1.9 grams of net carbohydrates per serving. These values make the recipe particularly appealing to people who track their carbohydrate intake. However, actual values can vary depending on the brands and sweeteners used. Anyone following a medically prescribed diet or managing blood glucose should check ingredient labels and serving sizes rather than assuming that a sugar-free recipe is automatically suitable for every individual.
18. Frequently Asked Questions About Ninja Creami Keto Chocolate Ice Cream
Why is my Ninja Creami chocolate ice cream powdery?
The frozen mixture may look powdery after its first processing cycle. Use the Re-spin function two to three times to improve the texture. If it remains powdery, add one tablespoon of almond milk and process again as needed.
Can I replace Swerve with another sweetener?
Yes. Monk fruit-based sweeteners and other keto-friendly alternatives can be used. However, sweetness and texture may vary depending on the product.
Can I make this recipe without a Ninja Creami?
Yes. Use the alternative freezer method with one-quarter teaspoon of guar gum. Freeze the mixture for two to three hours and allow it to soften before serving.
Can I add nuts or peanut butter?
Yes. Chopped nuts, coconut flakes, and peanut butter swirls are possible additions. Remember that extra ingredients change the nutritional values.
Is this recipe completely sugar-free?
It is prepared without regular added sugar and uses a sugar substitute. However, the listed ingredients and brands may contain small amounts of naturally occurring or residual sugars. Check the nutrition labels for precise information.
How long does the recipe take?
Active preparation takes approximately five minutes. The mixture then needs 24 hours in the freezer before processing, making the total preparation and freezing time approximately 24 hours and five minutes.
Can I store the finished ice cream?
Yes. Keep it covered in the Ninja Creami pint container and store it on a flat surface in the freezer.
What if the ice cream becomes too hard?
Use the appropriate Ninja Creami processing function to restore a softer texture. Follow the manufacturer’s instructions for processing previously frozen ice cream.
19. Final Thoughts on This Easy Ninja Creami Keto Chocolate Ice Cream
Homemade Ninja Creami Keto Chocolate Ice Cream is a practical way to enjoy a rich chocolate dessert while reducing the amount of added sugar in your frozen treats. The recipe uses a simple combination of almond milk, heavy cream, Dutch cocoa powder, and a low-carbohydrate sweetener to create a smooth chocolate base. Once the mixture has frozen for 24 hours, the Ninja Creami turns it into a creamy dessert with very little additional effort. You can keep it simple or add optional keto-friendly dark chocolate chips for extra texture and flavor. Whether you are looking for a homemade keto dessert, a low-carb chocolate ice cream recipe, or a new way to use your Ninja Creami machine, this recipe offers an easy starting point. Prepare the base ahead of time, follow the processing instructions, and enjoy a chocolate treat whenever the craving strikes.
Part 2: Structured Recipe Card
Ninja Creami Keto Chocolate Ice Cream
Description: This easy Ninja Creami Keto Chocolate Ice Cream is rich, smooth, and full of chocolate flavor. Made with unsweetened almond milk, heavy cream, Dutch cocoa powder, and a keto-friendly sweetener, it is a homemade low-carb frozen dessert that requires only five minutes of preparation before freezing.
Course: Dessert
Preparation Duration: 5 minutes
Freezing Duration: 24 hours
Processing Duration: Not separately provided
Total Duration: 24 hours and 5 minutes, excluding processing time
Serving: 4 servings
Ingredients
- ¾ cup unsweetened almond milk
- ¾ cup heavy cream
- ¼ cup allulose or Swerve
- 2 tablespoons Dutch cocoa powder
- 1 teaspoon sugar-free vanilla extract
- Optional: 2 tablespoons keto-friendly dark chocolate chips
Step-by-Step Instructions
- Prepare the ingredients: Measure the almond milk, heavy cream, sweetener, Dutch cocoa powder, and sugar-free vanilla extract.
- Blend the chocolate base: Add all five main ingredients to a blender. Blend until the mixture is smooth and the cocoa powder is completely incorporated.
- Fill the Ninja Creami container: Pour the prepared mixture into the Ninja Creami pint container. Make sure not to exceed the maximum fill line.
- Freeze the mixture: Place the container on a flat surface in the freezer and leave it for at least 24 hours.
- Prepare for processing: Remove the frozen pint from the freezer and allow it to sit at room temperature for a few minutes.
- Process the ice cream: Place the container into the Ninja Creami machine according to the manufacturer’s instructions. Select the Light Ice Cream setting.
- Improve the texture: If the ice cream looks powdery after the first cycle, use the Re-spin function two to three times until it becomes creamy.
- Adjust if necessary: If the mixture remains powdery after a couple of re-spins, add approximately one tablespoon of almond milk and process again.
- Add chocolate chips: If desired, add the keto-friendly dark chocolate chips and select the Mix-In function.
- Serve: Once the ice cream reaches your preferred consistency, serve immediately and enjoy.
Alternative Method Without a Ninja Creami
- Combine the original ingredients in a mixing bowl.
- Add ¼ teaspoon of guar gum and mix thoroughly.
- Transfer the mixture into a freezer-safe container.
- Freeze for approximately 2–3 hours.
- Remove the container and allow the ice cream to soften at room temperature for 10–15 minutes.
- Scoop and serve.
Nutritional Information
Approximate values per serving, based on four servings.
- Calories: 166.9 kcal
- Total Carbohydrates: 3 g
- Net Carbohydrates: 1.9 g
- Protein: 2 g
- Total Fat: 17 g
- Saturated Fat: 10.5 g
- Sodium: 73.6 mg
- Potassium: 81.9 mg
- Dietary Fiber: 1.1 g
- Sugar: 1.5 g
- Vitamin A: 656 IU
- Vitamin C: 0.3 mg
- Calcium: 89 mg
- Iron: 0.4 mg
Notes
- Use unsweetened almond milk to keep the carbohydrate content lower.
- Avoid overmixing the heavy cream in the blender.
- Leave sufficient space in the Ninja Creami pint container.
- Freeze the mixture for a full 24 hours before processing.
- If the first processing cycle produces a powdery texture, use the Re-spin function rather than repeating the Light Ice Cream setting.
- Add only one tablespoon of almond milk at a time if the mixture needs additional moisture.
- Use the Mix-In function to incorporate optional chocolate chips.
- Store leftover ice cream in its covered Ninja Creami pint container in the freezer.
- Nutritional values are estimates and may change depending on the sweetener, cream, cocoa powder, and optional toppings used.