There are some desserts that are delicious, and then there are desserts that seem to disappear from the serving plate before everyone has even finished their first slice. This chocolate brownie cake recipe belongs firmly in the second category. It brings together two beloved chocolate desserts—the dense, chewy brownie and the soft, tender chocolate cake—to create one wonderfully rich homemade treat.
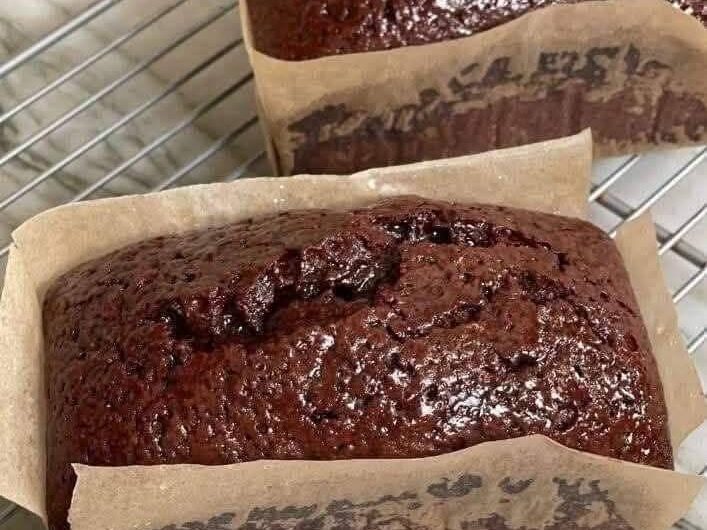
If you have ever stood in front of the kitchen wondering whether to make brownies or a chocolate cake, you no longer have to choose. This recipe gives you the best qualities of both. The outside develops a delicate, slightly crisp surface while the middle remains moist, dense, fudgy, and intensely chocolatey. Every bite has the familiar richness of a brownie but enough height and softness to remind you of a traditional cake.
The best part is that this fudgy chocolate brownie cake does not require complicated pastry techniques. You do not need professional baking equipment, difficult frosting methods, or advanced decorating skills. A mixing bowl, a cake pan, a whisk or electric mixer, and a few everyday baking ingredients are enough to create an impressive dessert in your own kitchen.
The deep chocolate flavor comes from a combination of dark chocolate and unsweetened cocoa powder. Butter gives the cake a luxurious richness, while the combination of white sugar and brown sugar helps create the characteristic brownie-like texture. Eggs provide structure and help give the cake its beautiful crackly top.
Whether you are a beginner baker or someone who regularly makes homemade desserts, this recipe is an excellent addition to your collection.
Why This Brownie-Style Cake Is So Irresistible
The magic of this dessert is its texture. A conventional chocolate cake is usually light and fluffy, while a classic brownie is much denser and chewier. This recipe sits comfortably between the two.
The outer portions have a pleasant baked edge, while the center stays wonderfully soft. When you cut into the cake, you can expect a moist crumb rather than a dry or overly airy texture. The melted chocolate and butter provide richness, while cocoa powder intensifies the chocolate character without making the cake heavy with unnecessary ingredients.
Another reason this dessert works so well is the balance of sweetness. Granulated sugar helps create a delicate crust, while brown sugar contributes moisture and a subtle caramel-like depth. Together, they complement the bitterness and complexity of dark chocolate.
The aroma is another major part of the experience. As the cake bakes, the fragrance of butter, cocoa, vanilla, and melted chocolate fills the kitchen. It is exactly the kind of homemade baking smell that makes people wander into the kitchen asking when dessert will be ready.
Everything You Need Before You Begin
One of the easiest ways to make baking less stressful is to organize your ingredients before starting. Measure everything first, prepare your pan, and allow ingredients that need to be at room temperature to warm slightly before mixing.
For this recipe, you will need:
- Unsalted butter: 1 cup or 225 grams, melted and cooled slightly
- Dark chocolate chips or chopped baking chocolate: 1.5 cups or 250 grams
- Granulated white sugar: 1.5 cups or 300 grams
- Brown sugar, packed: 0.5 cups or 100 grams
- Large eggs: 4 large eggs at room temperature
- Vanilla extract: 2 teaspoons or 10 milliliters
- All-purpose flour: 1 cup or 120 grams
- Unsweetened cocoa powder: 0.5 cups or 50 grams
- Salt: 0.5 teaspoon or 3 grams
- Baking powder: 0.5 teaspoon or 2.5 grams
- Warm water or brewed hot coffee: 0.25 cup or 60 milliliters
The ingredient list is intentionally straightforward. Most of these items are common pantry or refrigerator staples, which makes this an especially convenient easy brownie cake recipe when you want something impressive without making a special shopping trip.
Preparing the Pan for an Easy Release
Start by preheating your oven to 350°F (175°C). Allow the oven to fully reach temperature before the cake goes inside. Consistent oven heat is important because the batter begins changing as soon as it is exposed to heat.
For the best result, use an 8-inch or 9-inch round cake pan. Lightly butter the bottom and sides. Instead of coating the pan with regular flour, dust it with a small amount of cocoa powder. Rotate the pan so the cocoa lightly covers the buttered surfaces, then remove the excess.
Using cocoa powder is particularly helpful with a dark chocolate dessert because it prevents visible white flour marks from appearing around the edges of the finished cake.
If you prefer an even easier release, you can also use parchment paper on the bottom of the pan while still lightly greasing the sides.
Creating the Rich Chocolate Base
The first major step is melting the butter and dark chocolate together.
Set a heatproof bowl over a saucepan containing approximately two inches of gently simmering water. The bottom of the bowl should remain above the water rather than sitting directly in it. This creates a gentle double-boiler environment that melts the chocolate gradually.
Place the melted butter and dark chocolate into the bowl. Stir regularly with a rubber spatula as the chocolate softens. Continue until the mixture becomes completely smooth, glossy, and uniform.
Avoid allowing the chocolate to become excessively hot. Once everything has melted, take the bowl away from the heat and leave it on the counter for roughly five minutes.
The mixture should be warm but not scorching. Allowing it to cool slightly is important before it is combined with the eggs.
Beating the Eggs and Sugars for That Signature Brownie Crust
In a separate large bowl, combine the granulated sugar, packed brown sugar, and four room-temperature eggs.
Using an electric hand mixer, beat the mixture at medium speed for approximately three to four minutes. If you do not have an electric mixer, a sturdy whisk can also be used, although it will require more effort.
As you mix, the eggs and sugar should become lighter, thicker, and somewhat frothy. This step is more important than it may appear because incorporating air into the eggs and sugar helps contribute to the delicate, shiny crust that develops on top of the finished brownie cake.
Once the mixture has become noticeably lighter, add the vanilla extract. Continue mixing for about thirty seconds so the vanilla is evenly distributed.
Do not rush this stage. Properly beaten eggs and sugar can make a noticeable difference in the final texture.
Bringing the Wet Mixtures Together
Now it is time to combine the chocolate mixture with the beaten eggs.
Slowly pour the warm chocolate and butter mixture into the bowl containing the eggs and sugars. Fold or whisk gently rather than aggressively stirring everything at once.
The goal is to create an evenly colored chocolate batter while maintaining some of the air that was incorporated into the eggs.
Next, add the warm water or brewed hot coffee.
Coffee is especially useful when making a rich chocolate dessert because it can intensify the natural cocoa flavor. It does not have to make the finished cake taste like coffee. Instead, the small amount of brewed coffee works in the background to make the chocolate taste deeper and fuller.
If you prefer, warm water can be used instead.
At this stage, the batter should look glossy, dark, and wonderfully chocolatey.
Sifting the Dry Ingredients
In another bowl—or directly over the wet mixture—sift together the all-purpose flour, unsweetened cocoa powder, salt, and baking powder.
Sifting is worth doing because cocoa powder can develop small lumps during storage. Once those lumps are incorporated into the batter, they can remain as unpleasant pockets of dry cocoa.
A fine-mesh sieve makes this process quick and easy.
After sifting, use a silicone spatula to fold the dry ingredients into the chocolate mixture. Work gently, scraping along the bottom and sides of the bowl and bringing the batter upward.
Stop folding as soon as the flour has disappeared.
This is one of the most important rules for making a moist chocolate brownie cake. Once flour becomes hydrated, excessive mixing can encourage gluten development. Too much mixing can produce a firmer and less tender cake.
For a fudgy result, mix only as much as necessary.
Getting the Cake Ready for the Oven
Pour the finished batter into your prepared cake pan. Use a spatula to spread it evenly across the surface.
If you notice large air pockets, gently tap the pan against the counter once or twice. There is no need to bang the pan repeatedly.
Place the pan on the center rack of your preheated oven.
Bake for approximately 30 to 35 minutes.
Because ovens vary, start checking toward the end of the recommended baking time. The perfect brownie cake should not be completely dry in the center.
Insert a wooden toothpick into the middle. If it comes out with a few moist crumbs attached, the cake is ready. If the toothpick is covered with runny batter, give the cake another few minutes and test again.
Remember that the cake continues to cook and firm slightly as it cools. Waiting for a completely clean toothpick can result in an overbaked dessert.
The Cooling Stage Makes a Difference
Once baked, carefully remove the cake from the oven and place the pan on a wire rack.
Let it rest in the pan for around 20 minutes.
This cooling period allows the structure to settle. The center will become firmer while retaining the moist texture that makes this dessert special.
After the resting time, gently run a butter knife around the inside edge of the pan. Place a flat serving plate over the pan, carefully invert the cake, and lift the pan away.
Turn the cake upright again on your preferred serving plate.
For the cleanest slices, allow the cake to cool to warm or room temperature before cutting.
If you love especially dense and fudgy chocolate desserts, refrigerating the cooled cake can make the center even more brownie-like.
Simple Ways to Make This Chocolate Dessert Even Better
The quality of your chocolate has a major effect on the finished flavor. If possible, choose good-quality dark chocolate or baking chocolate. Chocolate with a stronger cocoa character will produce a deeper and more sophisticated result.
You can also experiment with the presentation without changing the basic recipe.
For a simple family dessert, serve each slice on its own. A light dusting of powdered sugar can make the cake look elegant without requiring frosting.
For a special occasion, serve a warm slice with vanilla ice cream. The combination of a warm, dense chocolate cake and cold, creamy ice cream creates a wonderful contrast.
Fresh berries are another excellent choice. Raspberries and strawberries bring a slight acidity that balances the richness of the chocolate.
A warm berry sauce can also turn a simple slice into a restaurant-style dessert.
Optional Ideas for Different Occasions
Although the original ingredient list is already complete, the finished cake can be presented in different ways depending on the occasion.
For a birthday celebration, you can decorate the cooled cake with chocolate curls, powdered sugar, or a simple chocolate topping.
For a dinner party, cut smaller slices and plate them with berries and ice cream.
For a casual weekend treat, simply serve the cake slightly warm.
You can even prepare the cake ahead of time. Once completely cooled, keep it properly covered so the moisture remains inside. The texture can become even denser after resting, making it an excellent make-ahead chocolate dessert.
How to Avoid a Dry Brownie Cake
The biggest mistake with a dessert like this is baking it for too long.
Unlike a traditional sponge cake, this recipe is supposed to retain moisture in the center. The toothpick should therefore have a few moist crumbs when the cake is ready.
Another important point is not to overmix after adding the flour. Once the dry ingredients disappear, stop folding.
Measuring ingredients accurately also matters. Baking is more precise than many other types of cooking, so weighing flour and chocolate when possible can improve consistency.
Finally, make sure your oven is properly preheated. Starting the cake in an oven that has not reached the correct temperature can alter the way it rises and sets.
Why Homemade Brownie Cake Beats a Boxed Dessert
One of the biggest advantages of preparing a homemade chocolate cake is control.
You know exactly what goes into the batter. Instead of relying on a boxed mix, you can use real butter, dark chocolate, cocoa powder, eggs, and vanilla to create a richer and more authentic flavor.
Homemade baking also gives you control over texture. You can decide whether to serve the cake warm and soft, at room temperature with a chewy center, or chilled for a denser, almost truffle-like consistency.
It is also an economical dessert because the ingredient list is uncomplicated. There is no need for elaborate decorations or expensive specialty ingredients.
A Dessert for Birthdays, Holidays, and Everyday Cravings
This chocolate brownie cake is versatile enough for almost any occasion.
It works beautifully as a birthday dessert, holiday sweet, dinner-party centerpiece, afternoon tea treat, or simple weekend baking project. You can make it when guests arrive unexpectedly or when you simply want the comforting aroma of chocolate filling your kitchen.
Children usually love its brownie-like texture, while adults appreciate the intense dark chocolate flavor.
It is also a great recipe for introducing new bakers to homemade desserts. The steps teach several useful baking skills, including melting chocolate, beating eggs and sugar, sifting dry ingredients, folding batter, testing doneness, and cooling a cake correctly.
Storage and Serving Suggestions
Allow the cake to cool completely before storing it.
Keep it covered at room temperature if you plan to eat it within a short period. For longer storage, refrigerate the cake in an airtight container.
When refrigerated, the texture becomes firmer and more intensely fudgy. You can enjoy it chilled or allow individual slices to sit at room temperature before serving.
If you prefer a warm dessert, gently warm a slice before adding ice cream or berries.
Always use a clean, sharp knife when slicing. For particularly neat pieces, wipe the blade between cuts.
Final Kitchen Notes
The secret to an excellent fudgy chocolate brownie cake is not complicated technique. It is attention to a few small details.
Use good-quality chocolate, properly measure the ingredients, allow the melted chocolate to cool slightly, beat the eggs and sugar sufficiently, fold the flour gently, and avoid overbaking.
Once you understand these basic principles, the recipe becomes remarkably straightforward.
The finished dessert should have a beautiful dark appearance, a delicate top, and a moist center packed with chocolate flavor. It is rich enough to satisfy serious chocolate lovers while remaining simple enough for a beginner to prepare.
Most importantly, do not worry about making the cake look perfectly professional. The charm of a homemade brownie cake is its rustic appearance and indulgent texture. Whether served on an elegant dessert plate or enjoyed directly from the kitchen, it is the kind of treat that turns ordinary moments into something special.
Part 2: Easy Chocolate Brownie Cake Recipe
Quick Recipe Overview
Prep Time: About 15 minutes
Bake Time: 30–35 minutes
Cooling Time: 20 minutes
Oven Temperature: 350°F (175°C)
Pan: 8-inch or 9-inch round cake pan
Servings: 8
Ingredients
- 1 cup (225 g) unsalted butter, melted and slightly cooled
- 1.5 cups (250 g) dark chocolate chips or chopped baking chocolate
- 1.5 cups (300 g) granulated white sugar
- 0.5 cup (100 g) packed brown sugar
- 4 large eggs, room temperature
- 2 teaspoons (10 ml) vanilla extract
- 1 cup (120 g) all-purpose flour
- 0.5 cup (50 g) unsweetened cocoa powder
- 0.5 teaspoon (3 g) salt
- 0.5 teaspoon (2.5 g) baking powder
- 0.25 cup (60 ml) warm water or brewed hot coffee
Simple Instructions
- Heat the oven: Preheat your oven to 350°F (175°C). Grease an 8-inch or 9-inch round cake pan and lightly coat it with cocoa powder.
- Melt chocolate: Combine melted butter and dark chocolate in a heatproof bowl over gently simmering water. Stir until smooth, then cool for about 5 minutes.
- Beat eggs and sugar: Beat white sugar, brown sugar, and eggs for 3–4 minutes until lighter and slightly fluffy. Mix in vanilla.
- Add chocolate: Slowly incorporate the warm chocolate-butter mixture. Stir in the warm water or hot coffee.
- Add dry ingredients: Sift together flour, cocoa powder, salt, and baking powder. Gently fold them into the chocolate mixture until just combined.
- Bake: Transfer the batter to the prepared pan and smooth the top. Bake for 30–35 minutes.
- Check doneness: A toothpick inserted in the center should come out with a few moist crumbs rather than completely clean.
- Cool: Let the cake rest in the pan for 20 minutes. Carefully remove it and cool further before slicing.
- Serve: Enjoy plain, with powdered sugar, fresh berries, chocolate sauce, or a scoop of vanilla ice cream.