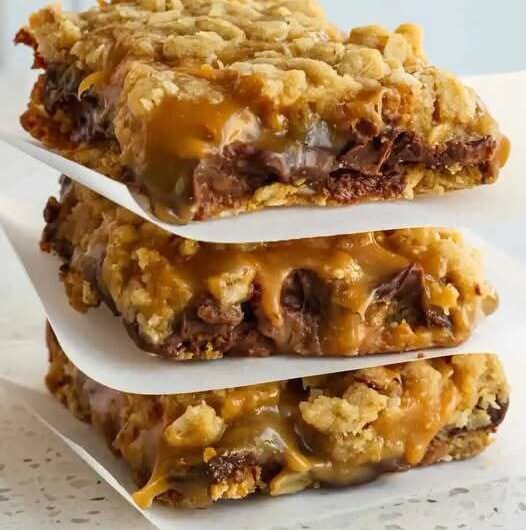
If you love caramel desserts, chewy oatmeal cookies, and rich chocolate treats, these homemade Carmelita bars are about to become one of your favorite recipes. They bring together three irresistible flavors in one simple dessert: buttery oats, smooth chocolate, and warm, gooey caramel.
Carmelitas are especially appealing because they look like an impressive bakery-style dessert while relying on everyday ingredients. You don’t need complicated decorating techniques, special equipment, or advanced baking skills. With a few pantry staples and a simple layering method, you can create a tray of golden-brown oatmeal caramel bars that are perfect for sharing.
The texture is what makes these bars so memorable. The oatmeal crust develops a lightly crisp, buttery exterior while remaining soft and chewy inside. Between the oat layers sits a generous combination of melted semi-sweet chocolate and creamy caramel sauce. Once the bars cool, the caramel settles into a wonderfully chewy filling that contrasts beautifully with the tender oatmeal crumble.
These easy Carmelitas are ideal for holidays, bake sales, afternoon treats, potlucks, dessert tables, family gatherings, or simply satisfying a serious caramel craving at home.
Why These Carmelita Bars Are So Hard to Resist
There is something special about the combination of oats, caramel, and chocolate.
Oats bring a slightly nutty flavor and hearty texture. Brown sugar adds a warm molasses-like sweetness, while butter makes the oatmeal mixture rich and tender. Semi-sweet chocolate contributes a deep cocoa flavor that keeps the dessert from becoming overwhelmingly sweet.
Then comes the caramel.
The caramel sauce melts between the oatmeal layers and creates the signature gooey center that makes Carmelitas different from an ordinary oatmeal cookie bar.
Every bite gives you several textures at once: crumbly oats, melted chocolate, soft caramel, and buttery baked goodness.
That contrast is one of the biggest reasons these bars are so popular.
The Simple Ingredients That Create Big Flavor
All-Purpose Flour
You’ll need 1 cup of all-purpose flour for the cookie base.
Flour provides structure and helps hold the oat mixture together during baking.
Rolled Oats
The recipe uses 1 cup of rolled oats.
Rolled oats give the bars their characteristic chewy texture and slightly rustic appearance. They also provide a pleasant contrast to the smooth caramel and melted chocolate.
Light Brown Sugar
Use ¾ cup packed light brown sugar.
Brown sugar adds sweetness as well as moisture, helping create a softer, chewier oatmeal layer.
Baking Soda
Just ½ teaspoon of baking soda helps the oat mixture develop a lighter texture during baking.
Salt
The recipe calls for ½ teaspoon salt.
Salt is important in desserts because it balances sweetness and helps the flavors of the butter, chocolate, and caramel stand out.
Unsalted Butter
You’ll need 12 tablespoons of melted unsalted butter.
Butter is responsible for much of the rich flavor in the oatmeal base and helps create those deliciously tender, golden edges.
Vanilla Extract
One teaspoon of vanilla extract adds warmth and enhances the overall flavor of the cookie base.
Semi-Sweet Chocolate Chips
You’ll use 1 cup of semi-sweet chocolate chips.
Semi-sweet chocolate is an excellent match for caramel because its slightly bitter cocoa notes balance the sweetness of the filling.
Soft Caramels
The caramel layer starts with 36 unwrapped caramels.
The original recipe recommends Kraft caramels, but the important thing is using soft caramels that melt smoothly.
Heavy Cream
½ cup heavy cream transforms the individual caramels into a smooth sauce that can be poured over the chocolate layer.
Preparing the Baking Pan
Before you begin mixing the ingredients, prepare your baking pan.
Preheat the oven to 350°F.
Line an 8 × 8-inch baking pan with parchment paper. You can also use aluminum foil sprayed with nonstick cooking spray.
Lining the pan is especially helpful with caramel desserts because the sticky filling can make the bars difficult to remove from an unlined pan.
If you use parchment paper, leave a little excess hanging over the sides. This creates convenient handles that can later be used to lift the cooled Carmelitas from the pan.
Creating the Buttery Oat Mixture
Place the flour, rolled oats, packed brown sugar, baking soda, and salt into a medium mixing bowl.
Add the melted butter and vanilla extract.
Use a fork to combine everything until you have a crumbly oatmeal mixture.
Don’t worry if the mixture doesn’t look like traditional cookie dough.
For this recipe, the crumbly texture is exactly what you want.
Part of this mixture forms the bottom crust, while the remainder becomes the golden topping that covers the caramel.
Building the First Layer
Take slightly more than half of the oatmeal mixture and transfer it into the prepared baking pan.
Press it down firmly enough to create an even base.
Try to distribute it all the way into the corners.
This layer needs to be compact because it forms the foundation for the chocolate and caramel filling.
Place the pan into the preheated oven and bake for approximately 10 minutes.
You’re looking for a lightly golden surface.
The crust doesn’t need to be completely browned at this stage because it will return to the oven after the filling is added.
Making the Smooth Caramel Filling
While the oatmeal base is baking, prepare the caramel sauce.
Place the 36 unwrapped caramels and ½ cup heavy cream in a microwave-safe bowl.
Heat the mixture in 60-second intervals.
After each interval, carefully remove the bowl and stir thoroughly.
Continue until all the caramels have melted and the cream has blended into a smooth sauce.
A whisk can be useful at the end to create a silky consistency.
Be careful when handling the bowl because melted caramel becomes extremely hot.
The finished sauce should be smooth enough to pour easily.
Layering the Chocolate and Caramel
Once the oatmeal crust has finished its first bake, remove the pan from the oven.
Immediately sprinkle the semi-sweet chocolate chips evenly over the warm crust.
Try to spread them across the entire surface so every eventual bar gets some chocolate.
Next, carefully pour the warm caramel sauce over the chocolate chips.
Spread it gently if necessary so the caramel reaches the edges.
As the warm caramel sits over the chocolate, the chips will begin to soften and melt.
This creates the rich chocolate-caramel center that makes these bars so irresistible.
Adding the Final Oat Crumble
Take the oatmeal mixture you reserved earlier.
Instead of pressing it down firmly, crumble it over the caramel layer.
Try to distribute it fairly evenly, but don’t worry about making the surface perfectly smooth.
Leaving some small spaces between the crumbs allows glimpses of caramel to show through as the bars bake.
Those golden oat crumbles will become crisp and fragrant in the oven while the caramel underneath bubbles.
The Final Bake
Return the assembled pan to the oven.
Bake for another 15 to 20 minutes.
The top should become golden brown, and the caramel should appear bubbly around the edges.
Keep an eye on the bars during the final few minutes.
You want the oatmeal topping to develop a beautiful golden color without allowing it to become too dark.
The caramel may look extremely loose and hot when the pan first comes out of the oven.
That’s completely normal.
The filling needs time to cool and set.
The Most Important Step: Cooling
As tempting as it may be to cut into these bars immediately, resist the urge.
Freshly baked caramel is extremely hot and much too soft to produce clean slices.
Allow the Carmelitas to cool completely in the pan.
If you need to speed things up, you can place the pan in the refrigerator after it has cooled somewhat.
Once the bars are thoroughly chilled, the caramel becomes firmer and easier to slice.
Use the parchment or foil lining to lift the entire dessert from the pan.
Then cut it into squares or bars with a sharp knife.
For cleaner cuts, wipe the knife between slices.
How to Get Beautiful Carmelita Layers
The secret to attractive Carmelitas is patience.
The bottom layer needs to be pressed firmly enough to create a stable base.
The caramel should be spread evenly rather than poured into one concentrated area.
The final oat mixture should be crumbled gently over the top.
Most importantly, the entire dessert should be allowed to cool before slicing.
If you cut the bars while they’re still hot, the caramel can run out and the layers may collapse.
If you prefer an extra-gooey dessert, you can serve the bars slightly warm, but expect them to be softer and messier.
Why Semi-Sweet Chocolate Works So Well
Caramel is naturally very sweet and rich.
Using semi-sweet chocolate creates a pleasant contrast.
The cocoa flavor provides some bitterness and depth, preventing the bars from tasting like pure sugar.
As the chocolate melts between the oatmeal and caramel, it becomes part of the filling rather than sitting separately.
This gives each bite a rich, almost candy-bar-like quality.
Serving Ideas for Homemade Carmelitas
These bars are delicious on their own, but there are plenty of ways to turn them into an even more indulgent dessert.
Serve a square with a scoop of vanilla ice cream for an easy restaurant-style dessert.
You can also drizzle a little extra caramel sauce over the top before serving.
For a holiday dessert table, cut the Carmelitas into smaller squares so guests can enjoy them alongside other sweets.
They also make an excellent addition to lunch boxes, afternoon coffee breaks, bake sales, and casual gatherings.
A cup of coffee or unsweetened tea pairs especially well with the rich caramel and chocolate flavors.
Keeping Your Carmelitas Fresh
Store cooled bars in an airtight container.
Keeping them covered helps preserve their chewy oatmeal texture and prevents them from drying out.
Because the caramel filling becomes firmer when chilled, you can enjoy the bars straight from the refrigerator or let them sit at room temperature briefly before serving.
If you prefer a softer, warmer texture, gently warm an individual bar before serving.
Common Mistakes to Avoid
Don’t Rush the Caramel
Microwave the caramels gradually and stir after every interval.
This helps create a smooth sauce and reduces the risk of overheating the mixture.
Don’t Skip the Pan Lining
Caramel is sticky.
Parchment paper or properly prepared foil makes removing the finished bars much easier.
Don’t Overbake the Oatmeal
The topping should be golden, not deeply browned.
Overbaking can make the oat layers harder and reduce the soft texture that makes Carmelitas special.
Don’t Cut Them Too Soon
This is probably the most important tip.
Hot caramel is runny.
Give the bars enough time to cool and set before slicing.
Don’t Pack the Top Crumble Too Firmly
The final oatmeal layer should remain crumbly rather than becoming a solid crust.
This gives the finished bars their characteristic rustic texture.
Why These Make a Great Homemade Gift
Carmelita bars are excellent for sharing because they can be cut into individual portions and arranged on a dessert platter.
Their golden oatmeal topping and visible caramel filling make them look homemade and inviting.
Wrap individual squares in parchment or place them in small treat bags for a simple edible gift.
They’re especially suitable for holiday cookie exchanges, office treats, bake sales, birthdays, and family celebrations.
Easy Ways to Enjoy Them Differently
Although the supplied recipe uses semi-sweet chocolate chips, the basic flavor combination can inspire several serving ideas.
For a richer dessert, serve the bars warm with vanilla ice cream.
For extra caramel flavor, add a small drizzle of caramel sauce just before serving.
For a simple presentation, dust the cooled bars very lightly with powdered sugar.
The key is not to overwhelm the main combination of oats, chocolate, and caramel.
What Makes This Dessert So Special?
The beauty of Carmelitas is that they’re not complicated.
There is no need to decorate a cake, pipe frosting, or prepare multiple complicated components.
Instead, you create one crumbly oatmeal mixture, make a simple caramel sauce, and layer everything together.
The oven does most of the work.
What comes out is a dessert with a bakery-style appearance and an irresistible combination of textures.
The buttery oats provide structure.
The chocolate adds richness.
The caramel provides the signature gooey center.
Together, they create a dessert that feels much more luxurious than the ingredient list suggests.
Frequently Asked Questions
Can I use quick oats?
Rolled oats are specified for this recipe and provide the intended texture. Changing the type of oats can alter the consistency of the bars.
Why are my Carmelitas too soft?
They may simply need more cooling time. Caramel remains very soft while warm and becomes firmer as it cools.
Can I chill them before cutting?
Yes. Refrigerating the pan is specifically useful when you want the bars to set faster and slice more cleanly.
Why did my caramel become hard?
Overheating caramel can change its texture. Heat it gradually and stir well between microwave intervals.
Can I make the bars ahead?
Yes. Carmelitas are convenient for preparing ahead because they need time to cool and set before serving.
How should I cut them?
Use a sharp knife once the bars are completely cool. Wiping the knife between cuts can help create cleaner edges.
Final Thoughts
These homemade Carmelita bars are the perfect dessert for anyone who believes that caramel and chocolate belong together.
The recipe combines a buttery oatmeal crumble with melted semi-sweet chocolate and a smooth caramel filling. After a final bake, the top becomes beautifully golden while the center remains rich and chewy.
What makes these easy caramel oatmeal bars especially appealing is their simplicity. The ingredients are familiar, the preparation is straightforward, and the finished dessert looks impressive enough for a celebration.
Whether you’re baking for a holiday gathering, preparing something special for your family, or simply craving a decadent homemade treat, these Carmelitas are an excellent choice.
The combination of crisp golden oats, soft caramel, and chocolate creates a dessert that is difficult to resist. Let them cool completely for clean slices, or enjoy them slightly warm when you want an extra-gooey caramel experience.
Source: Original rewrite based on the user-provided “Carmelitas: A Gourmet Caramel Delight” by Jodie Lawrence, November 8, 2023. The ingredient quantities and core preparation method have been retained, while the wording, headings, explanations, and presentation have been newly written.
Part 2: Simple Recipe Card
Easy Chocolate Caramel Carmelitas
Prep Time: 15 minutes
Bake Time: 25–30 minutes
Pan: 8 × 8 inches
Ingredients
For the Oatmeal Base
- 1 cup all-purpose flour
- 1 cup rolled oats
- ¾ cup packed light brown sugar
- ½ teaspoon baking soda
- ½ teaspoon salt
- 12 tablespoons unsalted butter, melted
- 1 teaspoon vanilla extract
- 1 cup semi-sweet chocolate chips
For the Caramel Layer
- 36 caramels, unwrapped
- ½ cup heavy cream
Directions
- Heat the oven: Preheat oven to 350°F. Line an 8 × 8-inch baking pan with parchment paper or sprayed foil.
- Make the oat crumble: Combine flour, oats, brown sugar, baking soda, salt, melted butter, and vanilla in a bowl. Mix with a fork until crumbly.
- Bake the bottom: Press slightly more than half of the oat mixture into the prepared pan. Bake for 10 minutes, until lightly golden.
- Prepare caramel: Microwave the unwrapped caramels and heavy cream in 60-second intervals, stirring well after each interval, until completely smooth.
- Add chocolate: Remove the partially baked crust from the oven and scatter the chocolate chips evenly over the top.
- Pour in caramel: Carefully spread the warm caramel sauce over the chocolate chips.
- Add the topping: Crumble the remaining oatmeal mixture over the caramel.
- Finish baking: Return to the oven and bake for 15–20 minutes, until the topping is golden and the caramel is bubbling.
- Cool completely: Let the Carmelitas cool completely before cutting. For faster setting, refrigerate the pan.
- Slice and serve: Cut into squares and enjoy these rich caramel chocolate oatmeal bars.