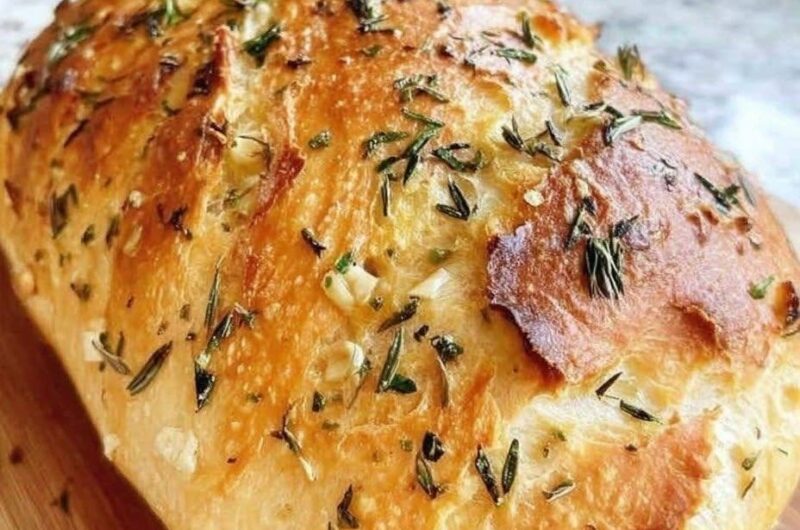
There is something wonderfully comforting about a freshly baked loaf of sourdough bread. The crisp crust, chewy center, subtle tang, and irresistible aroma can turn an ordinary meal into something special. When that classic sourdough flavor is combined with garlic, fragrant herbs, and a touch of black pepper, the result is an incredibly flavorful homemade loaf that is hard to resist.
This Garlic and Herb Sourdough Bread is a rustic bread recipe designed for home bakers who want something more exciting than a plain sourdough loaf without making the process unnecessarily complicated. The dough follows a straightforward sourdough method, while garlic powder, dried thyme or rosemary, and black pepper are mixed directly into the flour so the flavor is distributed throughout the loaf.
The finished bread has a beautifully browned crust and a soft, pleasantly chewy interior. Every slice carries a gentle garlic aroma and savory herb flavor, while the natural tang of sourdough gives the loaf enough character to stand on its own.
It is especially delicious served warm with butter, toasted with olive oil, alongside soup, or transformed into garlic toast. You can also use thick slices to make sandwiches, grilled cheese, breakfast toast, or crunchy homemade croutons.
If you already maintain a sourdough starter, this is an excellent way to give your regular baking routine a flavorful upgrade.
Why This Savory Sourdough Loaf Belongs in Your Baking Routine
A basic sourdough loaf is delicious, but adding a few carefully chosen seasonings can create an entirely different experience. Garlic and herbs complement the slightly acidic flavor of naturally fermented bread beautifully.
One of the best things about this recipe is that the flavor ingredients are added at the beginning. Instead of trying to create a complicated filling or stuffing, the garlic powder and dried herbs are whisked directly into the flour. This makes the process simple and helps distribute the seasonings evenly throughout the dough.
The result is a loaf that tastes flavorful from the crust to the center.
This homemade bread is particularly useful because it can be served in so many ways. You can make it part of a family dinner, prepare it for a weekend brunch, or bake a loaf specifically for sandwiches during the week.
Some of the reasons you may want to make this recipe include:
- Rustic homemade appearance
- Crispy golden-brown crust
- Soft and chewy sourdough interior
- Savory garlic flavor
- Fragrant thyme or rosemary
- Naturally fermented sourdough character
- Simple pantry ingredients
- No complicated bread-making equipment beyond a Dutch oven
- Excellent for soups and stews
- Delicious toasted with butter
- Wonderful for sandwiches
- Easy way to use an active sourdough starter
- Suitable for meal preparation
- Great for homemade gifts
The overnight refrigeration step also makes the recipe convenient. Much of the fermentation happens while the dough rests, allowing you to prepare the loaf in advance and bake it the following day.
The Secret Behind Flavorful Garlic Sourdough Bread
The key to this recipe is balance.
Garlic can easily become overpowering, particularly when fresh garlic is used in a long baking process. For this reason, garlic powder works particularly well here. It spreads evenly throughout the flour and provides a consistent savory flavor without creating concentrated pockets of garlic.
The dried herbs add another layer of flavor. Thyme gives the bread a delicate earthy character, while rosemary provides a more noticeable pine-like aroma. Both work especially well with sourdough.
A small pinch of black pepper adds another subtle dimension. It doesn’t make the bread aggressively spicy; instead, it helps round out the savory profile.
Meanwhile, the sourdough starter provides the characteristic fermented flavor and contributes to the loaf’s structure.
The beauty of the recipe is that none of these flavors has to dominate. The goal is a rustic loaf where the garlic, herbs, and sourdough complement one another.
Understanding the Ingredients in This Homemade Loaf
Although the ingredient list is short, every component has an important purpose.
Bread Flour Creates the Structure
Bread flour forms the foundation of the loaf. Its higher protein content helps create the gluten structure necessary for a strong sourdough dough.
Gluten provides elasticity and allows the dough to trap the gases produced during fermentation. This helps the loaf expand in the oven and develop an airy interior.
For this recipe, 500 grams of bread flour provides the main structure.
Using a kitchen scale is highly recommended when making sourdough because accurate measurements make it easier to achieve consistent hydration and fermentation.
Garlic Powder Gives Even Savory Flavor
One teaspoon of garlic powder provides the signature garlic character.
Adding it directly to the flour before the water is introduced is a simple but effective technique. It allows the seasoning to disperse evenly instead of creating concentrated areas of garlic.
Garlic powder is also convenient because it doesn’t introduce additional moisture into the dough.
Thyme or Rosemary Adds Fragrant Herbal Notes
You can use one teaspoon of dried thyme or rosemary depending on your preference.
Thyme creates a softer, earthy flavor, while rosemary gives the loaf a stronger aromatic presence.
If you’re serving the bread alongside Mediterranean-inspired dishes, either herb works beautifully.
Black Pepper Adds Subtle Warmth
A small pinch of black pepper may seem insignificant, but it helps bring the garlic and herbs together.
It adds mild warmth without changing the bread into a spicy loaf.
Active Sourdough Starter Provides Fermentation
The 100 grams of active sourdough starter is responsible for the fermentation that makes this a true sourdough loaf.
For best results, use a starter that is bubbly, active, and recently fed. A starter that has risen well and shows visible fermentation activity will generally provide better results than one that has been sitting inactive for a long period.
Water Controls the Dough Hydration
The recipe uses 350–375 grams of water.
The exact amount can vary because different flours absorb water differently. Start with the lower amount and add more if needed.
The goal is a hydrated, workable dough rather than a stiff mass.
Salt Balances Everything
Ten grams of salt provides seasoning and helps strengthen the dough.
Without enough salt, bread can taste flat even when it contains flavorful ingredients. Here, the salt helps emphasize the garlic, herbs, and naturally tangy sourdough flavor.
Olive Oil and Flaky Salt for the Crust
Olive oil and flaky salt are optional finishing ingredients.
A light coating of olive oil can encourage a beautiful golden crust, while flaky salt adds a pleasant finishing crunch and visual appeal.
You can also scatter a small amount of dried herbs over the surface before baking.
How to Build the Dough Without Making It Complicated
Sourdough baking can look intimidating when you first see recipes involving fermentation schedules, stretch-and-fold techniques, shaping, and overnight proofing.
The good news is that this particular loaf follows a manageable routine.
The first stage is mixing the dry ingredients.
Combine the bread flour, garlic powder, dried thyme or rosemary, and black pepper. Mixing these ingredients before adding water ensures that the seasonings are spread throughout the flour.
Next, add the water and stir until the flour is fully moistened. At this point, the dough will look rough and shaggy. That is completely normal.
Allowing the mixture to rest for approximately 30 minutes gives the flour time to absorb the water. This initial resting period also makes the dough easier to work with later.
After the rest, add the active sourdough starter and salt.
Mix thoroughly until the starter and salt are incorporated throughout the dough.
You don’t need to knead aggressively. Sourdough dough develops strength through time, fermentation, and repeated gentle folding.
Why Stretch and Folds Matter
During the first two hours of bulk fermentation, perform stretch-and-folds approximately every 30 minutes.
This technique helps strengthen the gluten network without requiring traditional intensive kneading.
To perform a stretch and fold, gently pull one side of the dough upward without tearing it and fold it toward the center. Rotate the bowl and repeat around the dough.
Over several rounds, the dough should become smoother, stronger, and more elastic.
Avoid handling the dough too aggressively. The goal is to develop strength while preserving the structure created during fermentation.
Watching the Dough During Bulk Fermentation
After mixing and the initial stretch-and-fold period, the dough continues fermenting at room temperature.
The recipe suggests approximately four to five hours for bulk fermentation.
However, sourdough fermentation is influenced by room temperature, starter activity, flour, and dough temperature. Because of this, the clock should be treated as a guide rather than an absolute rule.
A warmer kitchen can speed fermentation, while a cooler room may require more time.
As fermentation progresses, the dough should become noticeably more aerated and expanded.
Learning to observe the dough rather than relying entirely on a timer is one of the most valuable skills in sourdough baking.
Shaping Your Garlic Herb Loaf
Once bulk fermentation is complete, it’s time to shape the dough.
You can create either a round boule or an elongated batard.
Gently shape the dough without pressing out all of the air that developed during fermentation.
Place the shaped dough into a well-floured proofing basket with the seam facing upward.
Cover it and transfer it to the refrigerator for an overnight cold proof.
The dough can rest for approximately 12–16 hours.
This extended refrigeration period makes the baking schedule much more convenient and contributes to the flavor and texture of the finished loaf.
Why Overnight Sourdough Proofing Is So Useful
The cold fermentation stage is one of the reasons sourdough bread can develop such a complex flavor.
Instead of rushing the dough from mixing to baking, the overnight rest gives fermentation additional time to progress.
It also makes the dough easier to handle when it’s time to score and transfer it into the Dutch oven.
For busy home bakers, this is especially convenient. You can prepare the dough in the evening, refrigerate it overnight, and bake fresh bread the next day.
Getting a Crisp Sourdough Crust at Home
A Dutch oven is extremely useful for baking sourdough because it traps steam around the dough during the early part of baking.
That steam helps keep the crust flexible while the loaf expands.
For this recipe, preheat the oven and Dutch oven to 475°F.
Once the Dutch oven is thoroughly hot, carefully turn the chilled dough into it.
Use caution because the pot and lid will be extremely hot.
Score the surface of the dough with a sharp bread lame or suitable knife. The score gives the expanding loaf a controlled place to open as it bakes.
If desired, lightly brush the surface with olive oil and add flaky salt or additional herbs.
Place the lid on the Dutch oven and bake for approximately 20 minutes.
Then remove the lid and continue baking for another 20–25 minutes.
The uncovered portion of baking allows the crust to develop its deep golden-brown color and crisp texture.
The Most Important Step: Let the Bread Cool
Fresh bread smells incredible, and it can be tempting to slice it immediately.
Try to resist.
Allow the loaf to cool on a wire rack before cutting.
As the bread cools, the interior continues to set. Cutting too early can compress the crumb and release moisture before the loaf has finished stabilizing.
Once completely cooled, use a serrated bread knife to cut clean slices.
The contrast between the crisp crust and soft interior is one of the best parts of homemade sourdough.
Delicious Ways to Serve Garlic Herb Sourdough
This isn’t a bread that needs complicated toppings.
A thick slice with softened butter is enough to make a satisfying snack.
For breakfast, toast a slice and top it with eggs, avocado, cottage cheese, or your favorite spread.
At lunchtime, use it to create a grilled cheese sandwich or a hearty deli-style sandwich.
At dinner, serve it beside soup, stew, pasta, roasted vegetables, or a fresh salad.
The savory garlic and herb flavor also makes the bread particularly good with tomato-based dishes.
For a simple appetizer, cut the bread into slices, toast them with a little olive oil, and serve alongside a dip.
You can also turn leftover slices into homemade croutons.
Cut the bread into cubes, toss lightly with olive oil and herbs, then bake until crisp.
Simple Garlic Toast from Leftover Slices
If your loaf is beginning to lose its freshness, don’t throw it away.
Slice the bread and brush it lightly with olive oil. Add a little extra garlic powder, dried herbs, or flaky salt if desired.
Toast until golden and crisp.
Because the bread already contains garlic and herbs, the resulting garlic toast has a deeper flavor than ordinary bread.
You can serve it with pasta, soup, roasted chicken, grilled vegetables, or a simple salad.
How to Keep Homemade Sourdough Fresh
Fresh sourdough is best enjoyed within the first couple of days.
For short-term storage, wrap the loaf in a clean cotton cloth or use a bread bag and keep it at room temperature for approximately two to three days.
Avoid sealing the loaf tightly in plastic while it is still crusty. Trapped moisture can soften the crust.
For longer storage, slice the loaf and freeze the individual pieces in an airtight freezer-safe bag.
Frozen slices can go directly into the toaster, making this a convenient option for breakfast and quick snacks.
Easy Flavor Ideas for Your Next Loaf
Once you’ve mastered the basic garlic herb version, there are several ways to build on the flavor.
You can use thyme instead of rosemary, or rosemary instead of thyme.
Oregano can also complement the savory character of sourdough.
For a cheesy variation, you could explore adding suitable cheese during shaping, although this would change the original ingredient list.
Another flavorful direction is roasted garlic. Fresh roasted garlic creates a sweeter, softer garlic flavor, but it also changes the recipe’s moisture and handling characteristics. For the simplest version, garlic powder remains the easiest choice.
You can also finish the crust with additional dried herbs and flaky salt for a rustic bakery-style appearance.
Common Mistakes to Avoid
One of the biggest mistakes beginners make is using an inactive sourdough starter.
If your starter isn’t active and bubbly, the dough may ferment very slowly.
Another common problem is adding too much water too quickly. Flour varies in absorption, so adding the water gradually can make the dough easier to manage.
Don’t skip the stretch-and-fold process. Those gentle folds help create dough strength.
Avoid rushing the cold proof, too. The overnight rest is an important part of the recipe.
Finally, don’t cut the bread immediately after baking. Cooling is part of the process, not an optional extra.
Frequently Asked Questions About Garlic Herb Sourdough
What herbs work best in garlic sourdough bread?
Thyme and rosemary are excellent choices because their earthy, aromatic flavors complement both garlic and the natural tang of sourdough. Oregano and sage can also work well in variations.
Can I use dried herbs in sourdough?
Yes. Dried herbs are particularly convenient because they are easy to distribute through the flour and don’t introduce additional moisture into the dough.
Why use garlic powder instead of fresh garlic?
Garlic powder distributes evenly and gives consistent flavor throughout the loaf. It also avoids adding extra moisture and reduces the chance of concentrated garlic pieces becoming overly browned during baking.
How can I make sourdough more flavorful?
Longer fermentation, an active starter, a cold overnight proof, and flavorful additions such as herbs and garlic can all contribute to a more complex loaf.
Can I make this without a Dutch oven?
A Dutch oven provides excellent steam retention and helps create a crisp crust, but other baking methods can be used. The crust and rise may differ depending on the equipment.
Why is my sourdough bread dense?
Dense sourdough can result from an inactive starter, insufficient fermentation, underdeveloped dough strength, or cutting the bread before it has cooled. Pay attention to fermentation activity rather than relying only on the clock.
My Favorite Way to Enjoy This Rustic Loaf
For me, this garlic herb sourdough is at its best when served simply.
Take a thick slice, toast it until the edges are crisp, and spread it with butter while it’s still warm. The garlic and herbs become even more fragrant as the bread heats.
For dinner, place a basket of slices in the center of the table alongside a comforting bowl of soup.
The bread is hearty enough to soak up broth while remaining flavorful enough to enjoy on its own.
And if you’re serving guests, a rustic loaf wrapped in parchment paper makes a beautiful homemade food gift. Pair it with a small container of softened herbed butter or soft cheese for an easy presentation.
Final Thoughts on This Easy Garlic Herb Sourdough Recipe
Making sourdough bread at home doesn’t have to mean creating an overly complicated baking project.
This garlic and herb version takes the familiar process of homemade sourdough and gives it a savory upgrade with garlic powder, fragrant herbs, and black pepper.
The long fermentation creates depth, while the hot Dutch oven helps produce the crisp, golden crust that makes sourdough so satisfying.
Whether you serve it beside soup, turn it into sandwiches, toast it with butter, or transform leftover slices into crunchy croutons, this rustic sourdough loaf is versatile enough to become an everyday favorite.
If you already have an active starter waiting in your kitchen, this is a wonderful recipe to try when you want something beyond ordinary sourdough bread.
PART 2
Garlic Herb Sourdough Bread
A rustic homemade sourdough loaf flavored with garlic, thyme or rosemary, and black pepper. This crusty Dutch oven sourdough bread has a chewy interior and savory flavor, making it perfect for soup, sandwiches, toast, or serving with butter.
Recipe at a Glance
Course: Bread
Cuisine: Rustic
Diet: Vegetarian
Difficulty: Intermediate
Prep Time: About 12 hours, including overnight proofing
Bulk Fermentation: 4–5 hours
Cold Proof: 12–16 hours
Bake Time: 40–45 minutes
Total Time: About 13 hours
Yield: 1 loaf
What You Need
- 500 g bread flour
- 1 teaspoon garlic powder
- 1 teaspoon dried thyme or rosemary
- 1 pinch black pepper
- 100 g active sourdough starter
- 350–375 g water
- 10 g salt
- Optional: olive oil and flaky salt for the crust
Helpful Equipment
- Large mixing bowl
- Kitchen scale
- Dough scraper
- Proofing basket
- Dutch oven
- Parchment paper, if desired
- Sharp bread lame or knife
- Wire cooling rack
Easy Step-by-Step Method
1. Combine the Flour and Seasonings
Add the bread flour, garlic powder, dried thyme or rosemary, and black pepper to a large bowl.
Whisk or mix well so the seasonings are evenly dispersed throughout the flour.
2. Add Water and Rest the Dough
Pour in 350–375 g of water.
Mix until no large patches of dry flour remain and a shaggy dough forms.
Cover the bowl and allow the dough to rest for approximately 30 minutes.
3. Mix in Starter and Salt
Add the active sourdough starter and 10 g salt.
Work them into the dough until everything is thoroughly incorporated.
The dough may feel sticky at first, but it should become smoother as fermentation and folding continue.
4. Complete the First Fermentation
Cover the bowl and leave the dough at room temperature for approximately 4–5 hours.
During the first 2 hours, perform stretch-and-folds every 30 minutes.
After the folding stage, leave the dough undisturbed so it can continue fermenting and developing strength.
5. Shape the Loaf
Transfer the fermented dough to a lightly floured work surface.
Shape it into a boule or batard, handling it gently to preserve the air developed during fermentation.
Place it seam-side up inside a well-floured proofing basket.
Cover and refrigerate for 12–16 hours.
6. Heat the Dutch Oven
The following day, place your Dutch oven inside the oven.
Preheat to 475°F (245°C) and allow the Dutch oven to become thoroughly hot.
7. Score and Prepare the Dough
Carefully turn the chilled dough into the hot Dutch oven.
Score the top with a sharp bread lame or knife.
For an attractive finish, lightly brush the surface with olive oil and sprinkle with flaky salt or a small amount of additional dried herbs.
8. Bake Until Golden
Cover the Dutch oven and bake for 20 minutes.
Remove the lid and continue baking for another 20–25 minutes, or until the crust is deeply golden brown.
9. Cool Before Cutting
Carefully remove the bread from the Dutch oven.
Transfer it to a wire rack and allow it to cool completely before slicing.
This helps the crumb finish setting and gives you cleaner slices.
Best Serving Ideas
Enjoy this savory sourdough bread:
- Warm with butter
- Toasted with olive oil
- Alongside tomato soup
- With creamy soups and stews
- As sandwich bread
- For grilled cheese
- With eggs for breakfast
- As garlic toast
- With pasta dinners
- Cut into cubes for homemade croutons
Storage
Keep the loaf in a cotton bread bag or wrapped in a clean cloth at room temperature for approximately 2–3 days.
For longer storage, slice the bread and place the pieces in an airtight freezer-safe bag.
Frozen slices can be toasted directly from frozen.
Avoid storing crusty sourdough in tightly sealed plastic at room temperature because trapped moisture can soften the crust.
Recipe Tips
- Use an active, bubbly sourdough starter for better fermentation.
- Garlic powder provides even flavor throughout the loaf.
- Choose thyme for a delicate herbal flavor or rosemary for a stronger aroma.
- Start with 350 g water and add more only if needed.
- Don’t skip the stretch-and-folds.
- Keep the dough covered during fermentation so it doesn’t develop a dry skin.
- Refrigerating the shaped dough overnight makes the loaf easier to score and handle.
- Make sure your Dutch oven is fully preheated before baking.
- Allow the bread to cool completely before slicing.
Approximate Nutrition
Serving size: 1 slice
Calories: 150
Sugar: 0.5 g
Sodium: 210 mg
Fat: 1.5 g
Saturated Fat: 0.3 g
Unsaturated Fat: 1.2 g
Trans Fat: 0 g
Carbohydrates: 28 g
Fiber: 1 g
Protein: 4 g
Cholesterol: 0 mg
Nutrition information is approximate and may vary depending on the ingredients and serving size.
Frequently Asked Questions
What is the best herb for garlic sourdough?
Rosemary and thyme are two of the best choices. Rosemary creates a stronger, more aromatic loaf, while thyme gives the bread a softer earthy flavor.
Can I use garlic powder in sourdough bread?
Yes. Garlic powder is an easy way to add consistent garlic flavor. Mixing it with the dry flour helps distribute it evenly throughout the dough.
Can I use fresh garlic instead?
Fresh garlic can be used in other sourdough variations, but it changes the moisture and flavor of the dough. Garlic powder is used in this recipe because it is simple and provides even seasoning.
How long should garlic herb sourdough cool?
Allow the loaf to cool completely on a wire rack before slicing. Cutting too early can result in a gummy or compressed interior.
Why do I need to refrigerate the dough overnight?
The overnight cold proof gives the dough additional fermentation time and makes the shaped loaf easier to handle and score before baking.
Can I freeze garlic herb sourdough?
Yes. Slice the cooled bread before freezing so you can remove individual portions whenever needed. The slices can be toasted directly from frozen.
What can I do with leftover sourdough?
Turn leftover slices into garlic toast, croutons, breadcrumbs, grilled sandwiches, or crispy toast for serving with soups and salads.
Final Recipe Note
This easy garlic herb sourdough bread combines the tangy character of naturally fermented bread with aromatic herbs and savory garlic. With a crisp crust, chewy center, and versatile flavor, it is an excellent homemade sourdough loaf for everyday meals, weekend baking, and sharing with family and friends.