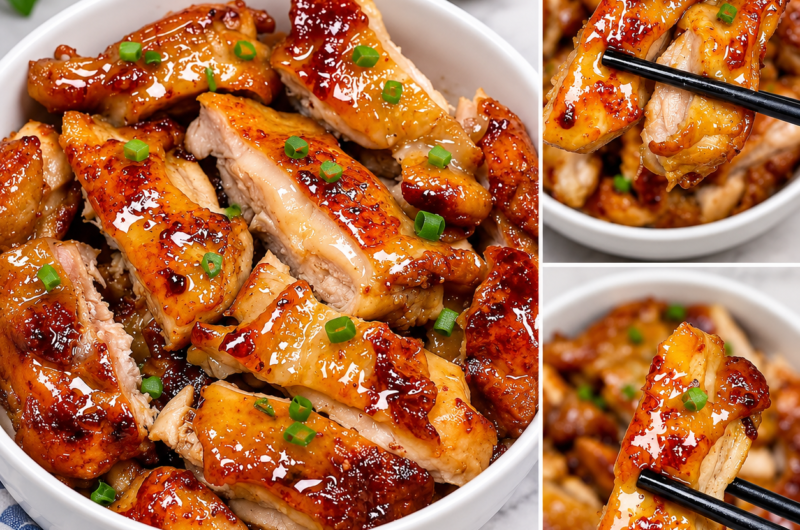
Honey Glazed Chicken is a skillet-cooked chicken dish finished with a flavorful sauce made from honey, garlic, soy sauce, apple cider vinegar, and butter. The combination creates a pleasant balance of sweetness, savory depth, and gentle acidity. Unlike recipes that require lengthy marinating or oven roasting, this version uses a straightforward stovetop method that allows the chicken and sauce to cook in the same pan. The chicken breasts are scored in a shallow diamond pattern, seasoned with salt and black pepper, and lightly coated with all-purpose flour before being seared. This preparation helps create a golden surface that holds the glossy honey garlic glaze. As the sauce simmers, it becomes slightly thicker and coats the chicken with a rich finish. Fresh chopped chives provide a simple garnish that adds color and mild onion flavor. The finished dish is a satisfying main course that can be paired with rice, potatoes, vegetables, or other favorite dinner sides.
Why This Easy Honey Garlic Chicken Recipe Is So Popular
Easy honey garlic chicken recipes are popular because they combine familiar ingredients with bold flavors and relatively simple cooking methods. Honey brings sweetness, garlic contributes a savory aroma, and soy sauce adds depth that balances the glaze. Apple cider vinegar introduces a gentle tanginess, preventing the sauce from tasting excessively sweet. Butter gives the mixture a rich finish, while the lightly floured chicken develops an attractive golden surface during cooking. Another reason this recipe is appealing is its convenience. Everything cooks in one skillet, which reduces the number of dishes that need cleaning afterward. The recipe also uses boneless chicken breasts, a familiar ingredient that is widely available and easy to serve. Since the glaze is prepared directly in the skillet after the chicken has been seared, it captures some of the browned flavors left behind during cooking. The result is a flavorful homemade chicken dinner that feels satisfying without requiring complicated techniques or unusual ingredients.
The Perfect Balance of Sweet, Savory, and Tangy Flavors
The defining feature of this honey glazed chicken recipe is its balanced sauce. Honey provides the sweetness that gives the glaze its name, while soy sauce contributes a savory, salty flavor. Fresh minced garlic adds aromatic depth, and apple cider vinegar supplies acidity that brightens the finished dish. These ingredients work together to create a sauce that tastes richer and more complex than honey alone. The butter used during cooking adds a smooth, slightly creamy quality that helps bring the flavors together. As the glaze simmers, some of the moisture evaporates, allowing the sauce to become more concentrated and coat the chicken. This combination produces a sticky honey garlic chicken finish without requiring bottled sauces or complicated seasonings. The balance is especially important because too much sweetness could overpower the chicken, while too much acidity could make the glaze sharp. Following the original ingredient measurements helps preserve the intended flavor and creates a satisfying combination of sweet, savory, and tangy notes.
Why Chicken Breasts Work Well for This Recipe
Chicken breasts are the main ingredient in this honey garlic chicken dinner because they have a mild flavor that pairs well with bold sauces. The original recipe uses three medium chicken breasts weighing approximately one and a half pounds in total. Boneless chicken breasts are versatile and can be cooked relatively quickly in a skillet when their thickness is suitable. Their mild taste allows the honey, garlic, soy sauce, and apple cider vinegar to become the dominant flavors without overwhelming the meat. Chicken breast also provides protein, making it a useful main ingredient for a balanced meal. However, chicken breasts can become dry when overcooked, so careful temperature monitoring is important. The original recipe uses shallow scoring to create a diamond pattern across the surface, which increases the area exposed to seasoning and glaze. The chicken is then lightly coated with flour and seared until golden. Cooking time will vary depending on thickness, so a food thermometer is more reliable than timing alone.
How Scoring Chicken Breasts Improves the Finished Dish
Scoring the chicken breasts is one of the distinctive preparation steps in this recipe. The process involves making shallow crisscross cuts across the top surface of each breast to form a diamond pattern. The original instructions recommend cutting approximately one-third of the way through the meat without slicing completely through it. This technique creates additional surface area where seasoning, flour, and sauce can settle. The cuts also give the finished chicken an attractive appearance, particularly after the glossy honey glaze coats the surface. Scoring should be done carefully with a sharp knife on a stable cutting board. Deep cuts can cause the chicken to separate or cook unevenly, so maintaining a shallow pattern is important. The scoring does not replace proper cooking or guarantee that the chicken will remain juicy, but it helps the glaze cling to the surface. The finished dish looks especially appealing when the diamond pattern becomes visible beneath the golden honey garlic coating.
The Importance of Seasoning Chicken Before Cooking
Seasoning the chicken before cooking helps establish flavor throughout the dish. This recipe uses salt and black pepper to taste, allowing the natural flavor of the chicken to complement the stronger ingredients in the honey glaze. Salt enhances the savory character of the meat, while black pepper contributes a mild warmth. Because soy sauce is also included in the glaze, it is helpful to season thoughtfully rather than adding excessive salt at the beginning. The chicken breasts should be seasoned on both sides so that every portion has a balanced flavor. After seasoning, the chicken is lightly coated with flour, which helps create a golden surface during searing. Proper seasoning is particularly important with chicken breast because its mild flavor can otherwise become overshadowed by the sauce. The goal is not to make the chicken heavily spiced but to establish a simple savory foundation. Once the honey garlic glaze is added, the seasoning and sauce work together to create a well-rounded finished dish.
Why a Light Flour Coating Makes a Difference
A light flour coating helps the chicken develop a golden exterior during pan-searing. The original recipe calls for one-quarter cup of all-purpose flour, with cornstarch listed as an alternative for a gluten-free preparation. After seasoning, each chicken breast is gently dredged in the flour, making sure some of the coating reaches the scored areas. Excess flour should be shaken off before the chicken enters the skillet. This step is important because a heavy coating can become pasty or interfere with the sauce. A thin layer creates a more delicate surface that browns attractively and helps the honey glaze cling to the chicken. The flour also contributes a small amount of thickening when it comes into contact with the sauce later in the cooking process. If using cornstarch, the coating may behave slightly differently, but it serves a similar purpose. For a strictly gluten-free meal, the soy sauce must also be verified as gluten-free because regular soy sauce commonly contains wheat.
The Role of Butter in Honey Garlic Chicken
Butter plays an important role in both cooking the chicken and finishing the honey garlic glaze. The original recipe calls for four tablespoons of butter, divided between the initial searing stage and the sauce preparation. Three tablespoons are added to the skillet before cooking the chicken, while the remaining tablespoon is used when the garlic is introduced. Butter contributes richness and helps create a flavorful golden surface on the chicken. As it melts, it coats the skillet and provides a cooking medium that encourages even browning. However, butter can burn if the pan becomes too hot, so moderate heat is important. The recipe also provides three tablespoons of olive oil as an alternative to butter. This option changes the flavor slightly but still provides fat for cooking. When using butter, gently swirling the skillet helps distribute it across the surface. The final glaze benefits from the richness of the cooking fat, which complements the sweetness of honey and the savory flavor of garlic.
Why Fresh Garlic Is Essential for the Honey Glaze
Fresh garlic gives this honey glazed chicken its distinctive savory aroma. The recipe uses four minced garlic cloves, which are added after the chicken has been seared. Garlic contains naturally occurring sulfur compounds that contribute to its strong aroma and recognizable flavor. When briefly cooked in butter, minced garlic becomes fragrant and develops a softer, more rounded taste. The timing is important because garlic can burn quickly, particularly when added to a hot skillet after the chicken has been cooking. Burned garlic may create a bitter flavor that affects the entire sauce. For this reason, the original instructions recommend cooking it only briefly before adding the remaining glaze ingredients. Mincing the garlic into small pieces helps distribute its flavor evenly throughout the sauce. As the honey, soy sauce, and apple cider vinegar simmer together, the garlic becomes part of a balanced mixture that coats the chicken. Its savory character prevents the glaze from tasting like a simple sweet syrup.
How Honey Creates a Sticky Golden Glaze
Honey is the main sweetening ingredient in this recipe and is responsible for the glaze’s characteristic sticky texture. The original recipe calls for one-third cup of honey or maple syrup. Honey contains naturally occurring sugars that become more concentrated as the sauce simmers, helping create a glossy coating around the chicken. Its sweetness balances the savory soy sauce, fragrant garlic, and tangy apple cider vinegar. When heated gently, honey blends with the other ingredients to form a smooth sauce that can be spooned repeatedly over the chicken. However, honey can scorch if exposed to excessive heat, especially when the liquid begins to reduce. Keeping the skillet at a controlled simmer helps prevent burning while allowing the sauce to thicken. The original recipe also allows maple syrup as an alternative, which produces a slightly different flavor. Both options provide sweetness, but honey generally creates the familiar taste associated with classic sticky honey garlic chicken recipes.
Why Soy Sauce Adds Savory Depth
Soy sauce is a small but important ingredient in the honey garlic glaze. The recipe uses one tablespoon, which adds saltiness and savory depth to balance the sweetness of honey. Soy sauce contains compounds that contribute to umami, a savory taste that makes many cooked dishes feel richer and more satisfying. In this recipe, it helps prevent the glaze from becoming overly sweet while complementing the flavor of the seared chicken. Because soy sauce is concentrated, a relatively small quantity can influence the entire sauce. The original measurement should be followed carefully to preserve the balance between sweet and savory ingredients. Regular soy sauce often contains wheat, which is important for people preparing the cornstarch variation as a gluten-free meal. A certified gluten-free soy sauce would be needed for that dietary requirement. When combined with garlic, honey, and apple cider vinegar, soy sauce helps create a glossy, flavorful coating that gives the chicken its signature finish.
How Apple Cider Vinegar Balances the Sauce
Apple cider vinegar adds acidity to the honey glaze, helping balance the sweetness of honey and the richness of butter. The original recipe calls for one and a half tablespoons, which is enough to create a gentle tang without dominating the sauce. Acidity is important in many savory recipes because it brightens flavors and prevents rich ingredients from tasting heavy. In this dish, apple cider vinegar works particularly well with garlic and soy sauce, creating a sweet-and-tangy finish. When the vinegar is added to the skillet, it blends with the honey and cooking juices to form a flavorful sauce. Simmering allows the ingredients to combine and reduces some of the sharpness of the vinegar. The finished glaze should taste balanced rather than strongly acidic. Following the original quantity helps achieve this result. Apple cider vinegar is included primarily for flavor, and the amount used in this recipe should not be associated with exaggerated claims about digestion, weight loss, or other medical benefits.
Choosing the Right Skillet for Honey Glazed Chicken
The skillet used for this recipe can influence how evenly the chicken cooks and how well the glaze develops. A large, heavy-bottomed skillet is useful because it distributes heat more consistently and provides enough space for the chicken breasts. Overcrowding the pan can trap moisture and reduce browning, so the chicken should have room to make contact with the cooking surface. A stainless steel, cast-iron, or suitable nonstick skillet can work, provided the heat is controlled carefully. The original method uses medium heat for searing, followed by gentle simmering when the glaze ingredients are added. A skillet with a wide cooking surface allows the sauce to reduce evenly and makes it easier to spoon the glaze over the chicken. Because honey contains sugar, the pan should not be excessively hot during the final cooking stage. A sturdy spatula or tongs can help turn the chicken safely without damaging the scored surface or disturbing the light flour coating.
How to Sear Chicken Breasts Until Golden Brown
Searing is the first cooking stage in this honey glazed chicken recipe. Begin by heating a large skillet over medium heat and adding three tablespoons of butter. Once the butter has melted, gently swirl the pan to distribute it evenly. Place the prepared chicken breasts in the skillet with the scored side facing down. The original instructions recommend cooking the first side for approximately five to six minutes, allowing the surface to develop an attractive golden color. The chicken is then turned and cooked for approximately four minutes on the second side. These times are guidelines rather than guarantees because chicken breasts vary in thickness and starting temperature. Avoid moving the chicken constantly while the first side is browning, as steady contact with the skillet encourages better color. If the butter begins to darken too quickly, reduce the heat. The goal is to create a golden exterior while allowing the interior to cook gradually without becoming dry.
How to Make the Perfect Honey Garlic Glaze
The honey garlic glaze is prepared directly in the skillet after the chicken has been seared. Add the remaining tablespoon of butter along with the minced garlic, allowing the garlic to cook briefly until fragrant. Next, add the honey or maple syrup, soy sauce, and apple cider vinegar. Stir gently so the ingredients combine with the butter and flavorful cooking juices in the pan. Allow the sauce to simmer for approximately two to three minutes, keeping the heat moderate to prevent the honey from scorching. As the liquid warms and reduces slightly, it becomes glossy and begins coating the chicken. Spoon the sauce repeatedly over the breasts so it reaches the scored areas and covers the surface evenly. The glaze should be thick enough to cling to the chicken but still fluid enough to spoon. If the chicken requires additional cooking time, maintain gentle heat and monitor the sauce closely to prevent burning while the meat reaches a safe temperature.
Why Basting the Chicken Improves the Flavor
Basting involves repeatedly spooning the warm honey garlic sauce over the chicken while it finishes cooking. This simple technique helps distribute the glaze evenly and creates the glossy appearance associated with sticky honey glazed chicken. Because the chicken breasts are scored in a shallow diamond pattern, some of the sauce can settle into the cuts, adding flavor to the surface. Basting also helps keep the top of the chicken coated while the underside remains in contact with the skillet. The original recipe recommends continuing this process as the sauce simmers for two to three minutes. Use a spoon to collect the glaze from the bottom of the pan and pour it over each chicken breast. Work carefully because hot honey sauce can cause burns. Basting improves the coating and presentation, but it does not replace proper cooking. The chicken must still reach an internal temperature of 165°F in the thickest part before it is safe to serve.
How to Keep Chicken Breasts Juicy and Tender
Keeping chicken breasts tender requires attention to thickness, heat, and cooking time. Chicken breast is relatively lean, so it can become dry when exposed to excessive heat or cooked beyond the necessary internal temperature. In this recipe, the chicken is first seared over medium heat and then finished in the honey garlic glaze. The sauce adds moisture and flavor to the surface, but it cannot completely reverse dryness caused by overcooking. A food thermometer is the most reliable way to determine when the chicken is ready. Insert it into the thickest part of the breast, avoiding contact with the skillet. The chicken should reach 165°F (74°C) before serving. Because the original recipe uses medium chicken breasts weighing approximately one and a half pounds in total, cooking times may vary considerably. If the breasts are especially thick, additional time may be needed. Gentle heat and careful monitoring help create a golden exterior without unnecessarily drying the meat.
Why Internal Temperature Matters More Than Cooking Time
The original honey glazed chicken recipe lists approximately ten minutes of cooking, but the individual steps include searing and simmering periods that may take longer when combined. More importantly, chicken breasts vary in thickness, and cooking time alone cannot confirm that the meat is safe to eat. The USDA recommends cooking chicken to an internal temperature of 165°F (74°C). This temperature should be measured in the thickest part using a reliable food thermometer. Chicken that appears golden on the outside may still be undercooked inside, particularly when the breasts are thick. Likewise, cooking chicken far beyond the safe temperature can produce a dry texture. The best approach is to follow the original method while checking the internal temperature before removing the skillet from the heat. If the chicken has not reached 165°F, continue cooking gently and monitor the glaze to prevent burning. Proper temperature control helps protect food safety while maintaining the best possible texture.
What to Serve With Honey Glazed Chicken
Honey glazed chicken pairs well with a variety of side dishes because its sauce combines sweetness, savory flavor, and mild acidity. Steamed white rice or brown rice is a popular choice because the grains absorb the extra honey garlic glaze. Mashed potatoes also work well, providing a creamy contrast to the sticky chicken. Roasted or steamed vegetables, including broccoli, green beans, carrots, and asparagus, add color and freshness to the plate. For a lighter meal, the chicken can be served alongside a simple green salad or cooked vegetables. The original recipe recommends spooning extra glaze over the chicken, and this sauce can also complement many side dishes. When planning the meal, consider the sweetness and saltiness already present in the glaze. Mildly seasoned sides often provide the best balance because they allow the chicken to remain the main attraction. The finished dish can be served as a family dinner or plated individually for a more polished presentation.
How to Serve Honey Garlic Chicken for Family Dinner
Serving honey glazed chicken is simple because the sauce and garnish provide much of the presentation. Once the chicken has reached the correct internal temperature, transfer the breasts to serving plates or a large platter. Spoon the remaining honey garlic glaze over the top, allowing it to settle into the shallow diamond cuts. Finish with freshly chopped chives, which add a bright green color and a mild onion flavor. The contrast between the golden chicken, glossy sauce, and green garnish makes the dish visually appealing without requiring elaborate decoration. For a family-style dinner, arrange the chicken on a platter with rice or vegetables served separately. This allows everyone to choose their preferred sides while enjoying the same flavorful main course. The chicken is best served warm because the glaze remains smooth and easy to spoon. If the sauce begins to thicken while standing, gentle reheating can help restore its consistency without exposing the chicken to excessive heat.
Can You Make Honey Glazed Chicken Ahead of Time?
Honey glazed chicken can be prepared ahead of time, although it generally tastes best immediately after cooking. If making it in advance, cook the chicken fully to 165°F and allow it to cool briefly before refrigerating. Transfer the chicken and remaining glaze into a shallow, airtight container and refrigerate promptly. Keeping the sauce with the chicken is important because it helps preserve flavor and provides moisture during reheating. When ready to serve, reheat the chicken gently until the thickest part reaches 165°F again. A covered skillet over low heat can work well, especially when the remaining glaze is included. Avoid prolonged high heat because honey can scorch and chicken breast may become dry. Preparing the garlic, measuring the glaze ingredients, and scoring the chicken ahead of cooking can also save time without requiring the entire dish to be cooked in advance. These simple preparation steps make the recipe convenient for busy schedules.
How to Store Leftover Honey Glazed Chicken
Leftover honey glazed chicken should be refrigerated promptly in a clean, airtight container. The original recipe recommends keeping the extra sauce with the chicken, which is useful because the glaze helps maintain flavor during storage and reheating. According to standard food safety guidance, cooked chicken can generally be refrigerated at 40°F (4°C) or colder for three to four days. The chicken should be placed in the refrigerator within two hours of cooking, or within one hour if the surrounding temperature is above 90°F (32°C). Dividing large portions into shallow containers helps them cool more quickly. When reheating, bring the chicken to an internal temperature of 165°F. The honey glaze may thicken after refrigeration, so gentle heating and stirring can help restore a smoother consistency. Avoid repeatedly warming and cooling the same leftovers. Proper storage helps preserve quality and reduces the risk of foodborne illness while making the remaining chicken convenient for another meal.
Can You Freeze Honey Garlic Chicken?
Honey garlic chicken can be frozen for convenient future meals. After the chicken has been fully cooked and cooled safely, place it in a freezer-safe airtight container or suitable freezer bag. Include the remaining glaze so the chicken stays coated and flavorful during storage. Remove excess air from the container when possible to help limit freezer burn. For the best quality, cooked chicken dishes are generally best used within approximately two to three months, although food kept continuously frozen at 0°F (-18°C) remains safe for longer. When ready to eat, thaw the chicken in the refrigerator rather than leaving it on the countertop. Reheat gently in a skillet or another suitable method until the internal temperature reaches 165°F. The sauce may separate or become thicker after freezing, but gentle stirring during reheating can help restore its texture. Freezing is particularly useful when preparing several portions in advance or saving leftovers from a family meal.
How to Reheat Honey Glazed Chicken Without Drying It Out
Reheating honey glazed chicken requires gentle heat because chicken breast can become dry and the honey sauce can burn if heated too aggressively. One convenient method is to place the leftover chicken and glaze in a covered skillet over low heat. Allow the chicken to warm gradually, turning it occasionally and spooning the sauce over the surface. The glaze may be thicker after refrigeration, but it should loosen as it warms. If the sauce begins to stick, reduce the heat rather than allowing it to scorch. The chicken must reach an internal temperature of 165°F before serving. A microwave can also be used, although heating in shorter intervals and checking the temperature helps reduce uneven warming. Covering the chicken during reheating can help retain moisture. Avoid reheating for longer than necessary once the safe temperature has been reached. Serving the chicken immediately after reheating helps preserve the best texture and allows the honey garlic glaze to remain smooth.
Common Mistakes to Avoid When Making Honey Glazed Chicken
Several common mistakes can affect the texture and flavor of honey glazed chicken. Cutting the scoring pattern too deeply may cause the chicken breasts to separate or cook unevenly. Applying too much flour can create a thick coating that becomes pasty when the sauce is added. Using excessive heat during searing may burn the butter before the chicken has cooked properly. Another mistake is adding garlic too early, which can cause it to become bitter before the glaze ingredients are introduced. Honey also requires careful temperature control because its sugars can scorch when the sauce reduces too quickly. Failing to baste the chicken may leave parts of the surface without an even coating. Most importantly, relying only on the suggested cooking times can lead to undercooked or overcooked chicken. A food thermometer should always be used to confirm that the thickest part reaches 165°F. Following the original measurements and controlling the heat helps create a reliable result.
How to Make Honey Glazed Chicken With Maple Syrup
The original recipe allows one-third cup of maple syrup as an alternative to honey. This substitution creates a slightly different version of the glaze while preserving the same basic cooking method. Maple syrup has a distinctive caramel-like flavor that can complement garlic, soy sauce, and apple cider vinegar. When heated in the skillet, it combines with the other ingredients to create a glossy sauce that coats the chicken. The sweetness remains important, but the finished flavor may be less floral and more caramel-like than a honey-based glaze. Because maple syrup and honey have different compositions, the sauce may also reduce somewhat differently. The best approach is to follow the original measurement and maintain gentle heat while simmering. The chicken should still be scored, seasoned, lightly dredged, and seared before the glaze is added. This alternative is useful for people who prefer the flavor of maple syrup while keeping the overall character of the recipe familiar.
How to Prepare a Gluten-Free Honey Glazed Chicken
The original recipe includes cornstarch as an alternative to all-purpose flour, making it possible to adapt the chicken coating for a gluten-free meal. The listed quantity is one-quarter cup of flour or cornstarch, so the original measurement can be maintained when choosing the alternative. Cornstarch creates a light coating that can help the chicken develop a golden exterior and allows the sauce to cling to the surface. However, replacing flour alone does not guarantee that the entire recipe is gluten-free. Regular soy sauce often contains wheat, so a certified gluten-free soy sauce is needed for people who must avoid gluten. All packaged ingredients should also be checked for potential cross-contact or unexpected gluten-containing additives. The remaining preparation method stays the same: score and season the chicken, coat it lightly, sear it in the skillet, and finish it with the honey garlic glaze. The result can retain the same sweet and savory character while meeting gluten-free dietary requirements.
Why Fresh Chives Make an Excellent Garnish
Fresh chopped chives provide the finishing touch for this honey glazed chicken recipe. Their bright green color contrasts beautifully with the golden-brown chicken and glossy honey garlic sauce. Chives have a mild onion-like flavor that adds freshness without overpowering the sweet and savory glaze. The original recipe does not specify an exact quantity, allowing the garnish to be adjusted according to preference. Before using chives, rinse them thoroughly and pat them dry. Chop them into small pieces so they can be sprinkled evenly over the finished chicken. Adding the chives just before serving helps preserve their fresh color and delicate flavor. Although chives contribute small amounts of vitamins and plant compounds, their primary role in this recipe is culinary rather than nutritional. They make the finished dish look more appealing and introduce a subtle contrast to the rich sauce. This simple garnish is particularly effective when serving the chicken for guests or family dinners.
Is Honey Glazed Chicken a Good High-Protein Dinner?
Honey glazed chicken can be part of a protein-rich dinner because chicken breast is a substantial source of dietary protein. The original recipe uses approximately one and a half pounds of chicken breast divided into three portions, providing a generous amount of meat per serving. Protein is important for maintaining and repairing body tissues, supporting muscle function, and contributing to normal physiological processes. However, the nutritional profile of the complete dish also includes carbohydrates from honey and flour, along with fat from butter or olive oil. The glaze adds sweetness and flavor but increases the overall calorie content compared with plain grilled chicken. The balance of the meal will depend on portion size and the side dishes selected. Serving the chicken with vegetables and an appropriate portion of rice or potatoes can create a satisfying dinner. People following specific dietary plans should consider the complete ingredient list rather than assuming that a chicken-based recipe is automatically low in carbohydrates or calories.
How Honey Glazed Chicken Fits Into Weekly Meal Planning
Honey glazed chicken is a useful recipe for weekly meal planning because it uses familiar ingredients and can be paired with several different side dishes. The original recipe produces three chicken breasts, making it suitable for a small family dinner or individual portions prepared for later meals. The chicken can be served with rice one day and vegetables or potatoes another day, allowing variety without preparing a completely different main dish. Since the sauce is made in the same skillet, cleanup is relatively simple. Preparing the ingredients before cooking can make the process even more convenient. Garlic can be minced, the honey glaze ingredients can be measured, and the chicken can be scored shortly before cooking. Once prepared, leftovers should be refrigerated promptly and consumed within the recommended storage period. Although the recipe is often described as a quick dinner, cooking time should always be adjusted according to chicken thickness. Reliable temperature monitoring makes the recipe easier to prepare consistently.
Honey Glazed Chicken – Easy Honey Garlic Chicken Breast
Description
This easy Honey Glazed Chicken recipe features tender, golden-brown chicken breasts coated in a sticky honey garlic sauce. Fresh garlic, honey, soy sauce, apple cider vinegar, and butter combine to create a sweet, savory, and slightly tangy glaze. The chicken is cooked in one skillet, basted with the sauce, and finished with freshly chopped chives.
Perfect for a quick weeknight dinner, this homemade honey garlic chicken pairs well with rice, mashed potatoes, or steamed vegetables.
Preparation & Cooking Duration
- Preparation Time: 5 minutes
- Cooking Time: 10 minutes (original estimate; allow longer as needed)
- Estimated Total Time: 15 minutes or more, depending on chicken thickness
- Course: Main Course, Dinner
- Cuisine: American
- Difficulty: Easy
- Cooking Method: Stovetop, Pan-Seared
- Equipment: Large Skillet, Sharp Knife, Cutting Board, Measuring Cups, Measuring Spoons, Spatula, Food Thermometer
Serving
Servings: 3
Serving Size: 1 medium chicken breast with honey garlic glaze
Serving Temperature: Warm
Flavor: Sweet, savory, garlicky, and slightly tangy
Ingredients
For the Chicken
- 3 chicken breasts, medium, about 1 1/2 lbs
- Salt and black pepper, to taste
- 1/4 cup all-purpose flour, or cornstarch for gluten-free
- 4 Tbsp butter, divided (or 3 tbsp olive oil)
For the Honey Glaze
- 4 garlic cloves, minced
- 1 1/2 Tbsp apple cider vinegar
- 1 Tbsp soy sauce
- 1/3 cup honey or maple syrup
- Fresh chives, chopped for garnish
Step-by-Step Instructions
Step 1: Score the Chicken Breasts
Place the chicken breasts on a clean cutting board.
Using a sharp knife, make shallow crisscross cuts across the top of each chicken breast to form a diamond pattern.
Cut approximately one-third of the way through the meat, taking care not to slice completely through.
Step 2: Season the Chicken
Season both sides of each chicken breast with salt and black pepper to taste.
Distribute the seasoning evenly across the surface and into the scored areas.
Step 3: Coat With Flour
Place the all-purpose flour on a plate.
Lightly dredge each chicken breast in the flour, pressing gently so the coating reaches the scored areas.
Shake off any excess flour before cooking.
For the gluten-free coating option, use the listed cornstarch alternative. Check the soy sauce separately for gluten.
Step 4: Heat the Skillet
Place a large skillet over medium heat.
Add three tablespoons of butter and allow it to melt, gently swirling the skillet to distribute the butter.
If using the olive oil alternative, follow the original ingredient option.
Step 5: Sear the Chicken
Place the chicken breasts in the hot skillet with the scored sides facing down.
Cook for approximately five to six minutes, or until the first side develops a golden-brown color.
Step 6: Flip the Chicken
Carefully turn the chicken breasts over using a spatula or tongs.
Cook the second side for approximately four minutes, adjusting the time as necessary according to thickness.
The chicken may not yet be fully cooked at this stage.
Step 7: Add the Garlic
Add the remaining tablespoon of butter to the skillet along with the minced garlic.
Stir briefly until the garlic becomes fragrant, taking care not to burn it.
Step 8: Prepare the Honey Glaze
Pour the honey or maple syrup, soy sauce, and apple cider vinegar into the skillet.
Stir gently until the ingredients combine with the butter and garlic.
Step 9: Simmer the Sauce
Allow the glaze to simmer gently for approximately two to three minutes.
As the sauce warms, it should become glossy and slightly thicker.
Avoid excessive heat because the honey can scorch.
Step 10: Baste the Chicken
While the glaze simmers, repeatedly spoon the sauce over the chicken breasts.
Make sure the glaze coats the scored areas and covers the chicken evenly.
Step 11: Check the Internal Temperature
Insert a food thermometer into the thickest part of each chicken breast.
Continue cooking as necessary until the chicken reaches an internal temperature of 165°F (74°C).
Do not rely only on the suggested cooking times.
Step 12: Garnish and Serve
Remove the skillet from the heat.
Transfer the chicken breasts to serving plates and spoon the remaining honey garlic glaze over the top.
Sprinkle with freshly chopped chives and serve warm.
Notes
Scoring the Chicken
Make shallow cuts approximately one-third of the way through each chicken breast. Avoid cutting completely through the meat.
Light Flour Coating
Use a thin coating of flour and shake off any excess before cooking. This helps create a golden exterior without a heavy crust.
Butter or Olive Oil
The original recipe allows four tablespoons of divided butter or three tablespoons of olive oil as the cooking fat.
Preparing the Glaze
Measure the honey, soy sauce, and apple cider vinegar before beginning the final cooking stage so they can be added quickly.
Preventing Burned Garlic
Add the minced garlic after searing the chicken and cook it only briefly before introducing the liquid glaze ingredients.
Controlling the Heat
Keep the sauce at a gentle simmer to prevent the honey from scorching.
Basting the Chicken
Spoon the glaze over the chicken repeatedly while it simmers for an even coating.
Safe Cooking Temperature
Chicken must reach an internal temperature of 165°F (74°C). Thicker breasts may require additional cooking time beyond the original estimate.
Gluten-Free Preparation
Use cornstarch instead of all-purpose flour and ensure that the soy sauce is certified gluten-free.
Maple Syrup Alternative
The original recipe allows maple syrup instead of honey in the same listed quantity.
Serving Suggestions
Serve the chicken with steamed rice, mashed potatoes, roasted vegetables, or a simple salad.
Refrigerating Leftovers
Store cooked chicken with the remaining glaze in an airtight container in the refrigerator for three to four days.
Freezing
Freeze cooked chicken with the glaze in a suitable freezer-safe container. For best quality, use within approximately two to three months.
Reheating
Reheat gently until the chicken reaches an internal temperature of 165°F (74°C).
Nutritional Information
Estimated nutrition per serving — 1 chicken breast with glaze
The original recipe lists 416 calories per serving but does not provide a complete nutritional breakdown. The following values are approximate estimates based on three servings, using honey, butter, and all-purpose flour.
| Nutrient | Approximate Amount |
|---|---|
| Calories | 540–600 kcal |
| Protein | 52–57 g |
| Total Carbohydrates | 35–40 g |
| Total Fat | 19–23 g |
| Saturated Fat | 10–13 g |
| Dietary Fiber | 0–1 g |
| Total Sugars | 30–32 g |
| Sodium | Varies with seasoning and soy sauce |
| Cholesterol | Varies with chicken and butter |
Total Servings: 3
Nutrition Note: These estimates are not laboratory-tested. The calorie estimate differs from the source’s stated 416 kcal because the listed ingredient quantities, particularly the chicken, butter, and honey, can produce a higher total. Actual values depend on the chicken weight, amount of coating retained, cooking fat used, and how much glaze is consumed. Maple syrup, olive oil, and cornstarch alternatives will also affect the nutritional values.